The good folks at XS Sights recently sent me their new Glock Sight Pusher Kits to test out. These are offered in two flavors: the DIY Series™and their Gunsmith Series™. While there are some notable features that differ between the two, the main one is the projected tool life. The DIY Series™is expected to last between 50 and 100 installs. Step up to the Gunsmith Series™, and in addition to being a little faster, it should last for over 200 installs. Both do the same thing, with the same level of precision. If total volume and overall speed are more important, spring for the more expensive one. Conversely, if you just want to install a few sets of sights, and maybe loan it to your friends, save $50 and get the less expensive model.
I’ll break down the differences a bit more as I use each one to install some XS R3D Night Sight sets. Note that right now, you can get either one by itself, or with a set of sights. Buy the bundle and save some cash. I’ve got another brand of sight pusher that I have used for a while now, and I’ll be very up-front here. It was more expensive, but isn’t nearly as easy and fast to use. The XS Sight Pusher uses the very simple principle of leverage to remove and install sights. And the open top design makes it faster to use, and harder to screw things up. The angled tool and matching wedge make it easy to accommodate different width slides with no fiddly adjustments. If the simplest solution is the best solution, then this tool is the best tool.
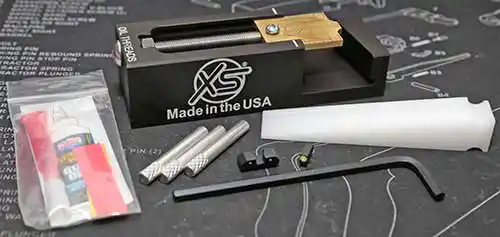
XS Sights DIY Series™Glock Sight Pusher Bundle with R3D Night Sights
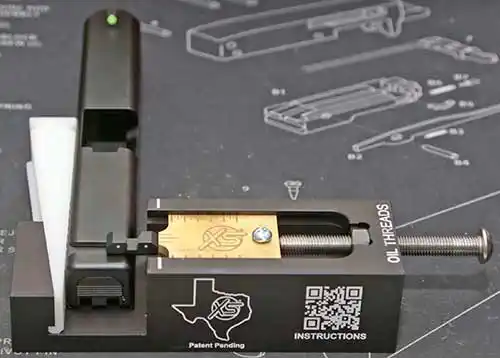
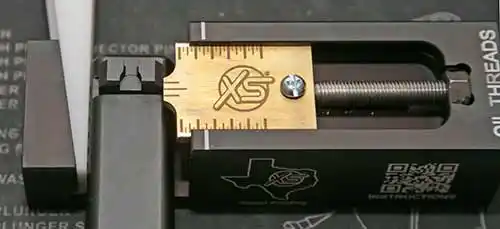
The XS Sights DIY Series™Glcok Sight Pusher tool by itself retails for $150 but is bundled with a set of R3D Night Sights for only $199.99 (regular price $254.99*), which is a nice savings. It includes the sight pusher, front sight tool*, and instructions. There’s also a tube of Vibra-Tite® 131 red threadlock, and some Lucas Oil Products® Extreme Duty Gun Oil for the tool threads. And a piece of foam for Glock 42 sight installations. Leverage is provided by the included 4″ allen key, and a 3″ long, 5/16-24 stainless bolt. That bolt is attached to a non-marring brass pusher bit. The pusher bit has hash marks making it easy to center the rear sight. There are even some simple go/no-go paper gauges for troubleshooting really tight sights. Total kit weight is 1.4 pounds.
*My kit included three XS-manufactured aluminum front sight tools, and a coupon for a free steel front sight tool. XS Sights manufactures all their sights and tools at their Fort Worth, Texas facility. Due to a supply chain issue, they missed the deadline on getting the steel tools included. They expect to have them available in January, 2023, so if you order your tool then, it shouldn’t be an issue. Meanwhile, they’re assuring purchasers that the aluminum tools will last through several installs.
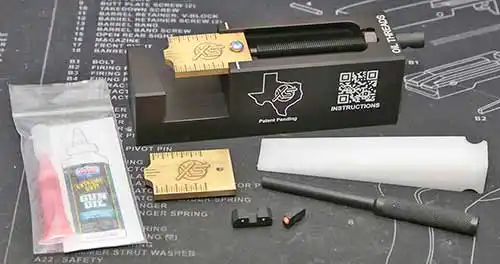
XS Sights Gunsmith Series™Glock Sight Pusher Bundle
Stepping up to the XS Sights Gunsmith Series™Glock Sight Pusher, expect to pay a bit more, as it retails for $200. If you want the full bundle of the tool and some R3D Night Sights, that jumps to $304.98. This is still less than buying the tool and sights separately. Inside the box is the sight pusher, an enhanced steel/magnetic front sight tool, instructions, and the same red threadlock and oil. And of course the piece of foam for Glock 42s. Additional leverage is provided by 4.25″ front sight tool that works as a T-handle. Inside the tool is a 3.75″ long, 5/16-24 steel black oxide bolt. Instead of a single non-marring brass pusher bit, this kit includes a spare. And of course the fancy paper go/no-go gauges. One thing I did notice is that it’s about 1/4 taller, with more height to the base portion. That extra height and 2nd pusher bit, along with the steel front sight tool, and longer bolt bring the total kit weight to 1.8 pounds.
In case it’s not clear, the difference here is the extra pusher bit, more durable bolt, and upgraded front sight tool. The former are the wear items, while the latter provides more leverage, for more speed. In actual use the speed isn’t going to be as important as how long the tools last. Buy the Gunsmith Series™for the volume – the speed is really just a nice little bonus.
Front sight installation
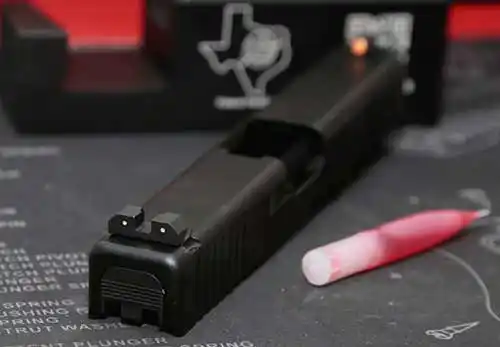
This is the same for either tool and really isn’t too different from installing any other front sight on a Glock or aftermarket slide. Which also is why you get a single photo. Since I had a brand new OEM slide, I’m going to start there. If you have a complete pistol, be sure to follow all safety rules with your unloaded (check it twice) firearm as you remove the slide. Use the front sight tool to remove the sight’s screw. Note that it’s much longer than the XS Sights screw, so be sure to keep them separate. Thoroughly clean and degrease the top of the slide as well as the underside where the front sight fits. Also degrease the new front sight and screw threads.
Place the screw into the tool, and dab a medium drop of threadlock on the threads. Use a much more liberal amount of threadlock on the base of the front sight. Coat it good, as the excess will get wiped off later. Stick the front sight into the hole in the slide, making sure it’s oriented correctly, and squared up. With your weak hand holding the slide and your index finger keeping the sight in place, flip the slide over. Carefully use the front sight tool to install the front sight, finger tight. No need to go more than finger tight, the threadlock will keep it in place. Give it at least 15 minutes before wiping off the excess threadlock, and a full 24 hours to cure. As the sights are steel, a light coat of oil should be applied to prevent rust.
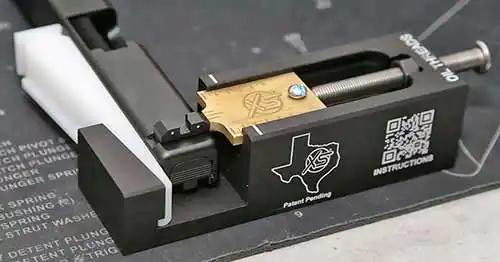
Using the Glock Sight Pusher to remove the existing rear sight
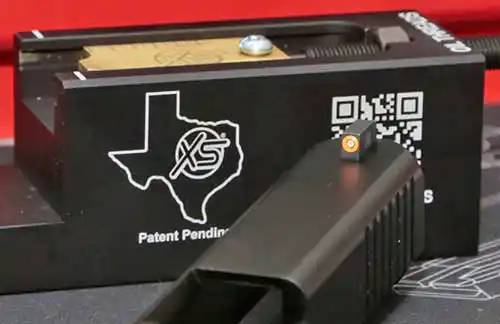
This tool is pretty simple to use. A little oil on the bolt threads, and back it out to the white lines on the tool, so you can get the slide into the clamp area. Notice the far side is cut at an angle? That’s so the wedge can square things up. Pretty much any width slide is going to fit, without having to make any adjustments. Push the wedge. Done. Make sure the brass pusher bit is lined up with the rear sight, and that it’s not going to hit the slide. Then hold the pusher with your weak hand, and use your strong hand to push the sight out by turning the bolt. On the DIY Series™tool, insert the allen key into the bolt head to do that. With the Gunsmith Series™, use the steel front sight tool in the hole in the end of the bolt.
Aftermarket sights or slides may require more effort, but the OEM sight in an OEM slide gave up pretty easily. It was actually much easier than expected. But I’ve also never had to remove the stock Glock sights before. Perhaps it’s easy because they are one of the first things many people replace. Either way, it was very easy. This is the point where you’ll want to clean and degrease the dovetail really well. Or at least make a decision how to proceed, based on whether you’re using an OEM or aftermarket slide. The new sights will make a difference too, with XS Sights being easier to install compared to other aftermarket brands.
XS Sights R3D Night Sight installation using the DIY Series™Glock Sight Pusher
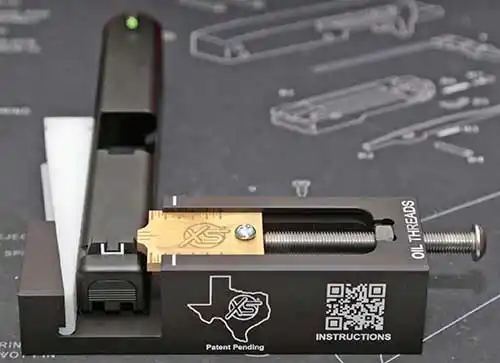
Installation is nearly as quick and easy, even though I chose to degrease the slide and not rely on a little oil for assistance. Start by pushing the new sight in as far as you can by hand. Make sure it’s straight, and not canted to either side. Place the slide back in the tool, with the pusher bit against the sight. Slowly twist the bolt to push the sight in. Be sure to check alignment as the pusher bit gets close to the slide. As long as the alignment looks good, continue pushing the sight until it appears centered.
This is a good time to mention the hash marks on the pusher bit. They serve a purpose, and it’s again, very simple. Note which hash mark the white line on the pusher is closest to. Pay careful attention to whether it’s lined up, or a bit to either side of a hash mark. Take a picture with your phone if you want to make it easier. Then back the pusher bit out until you can remove the slide, rotate the slide, and put it back in the tool.

Run the pusher bit back out to the point where it contacts the sight. If the hash mark lines up with the white line, you’re golden. If not, the sight will need a push in either direction, until it’s centered. Once it’s centered, you can apply threadlock. If you have access to a range, feel free to check the sight alignment before applying threadlock. Of course, you can make adjustments later using the sight pusher, and then reapply threadlock.
XS Sights R3D Night Sight installation using the Gunsmith Series™Glock Sight Pusher
As tempting as it might be to copy and paste the previous two paragraphs, I didn’t. But it’s nearly the same. The only difference between the two tools when it comes to installing the rear sight is the leverage. Instead of an allen key in a bolt head, the Gunsmith Series™sight pusher uses the steel front sight tool. And it goes through the hole in the end of the bolt. So it’s a T-handle instead. Everything else is the same. Admittedly, this tool is a little faster. But not so much that it’s going to save you more than a minute or two. That may add up for an armorer, or a range that rents a lot of Glocks. For the rest of us, it’s not a huge selling point. Buy it for the longevity (volume), as I mentioned earlier.
Enough of the technical talk, let me sum this up
XS Sights designs their sights to be easy to install, and then came up with a tool that makes it effortless. I’m not sure which impresses me more – that it’s so simple to do it correctly, or that it’s really difficult to screw things up. With the open-top design, you can see exactly what you’re doing, and verify alignment of the pusher bit. Plus the hash marks make centering the rear sight less prone to error. I had set aside a couple of hours to do this and take photos. But the XS Sights Glock Sight Pusher made it feel more like a five or ten minute job. Read the directions, take your time, and there’s really no way to make a mistake. Unless you install sights backwards. Between the plastic wedge and brass pusher bit, nothing is going to get marred either. Painless.
Check the prices of XS Sights at Opticsplanet.com
Check the prices of XS Sights at Amazon.com
More observations and musings
Neither version of the tool will work with sights that have angled sidewalls. The pusher bit requires a squared edge to butt up against. And then there is the price. $150 is reasonable for a tool of this quality. If you’re ordering some XS Sights for your Glock or clone, it probably makes sense to get the tool as well. Here’s my logic: The “average” Glock owner owns one Glock. It may even have OEM sights. They don’t need this tool. The “average” Glock enthusiast has several. And they have slide cuts, optics, night sights, and suppressor sights. They probably get switched up once in a while too. And their friends may have similar taste in firearms. Considering that gunsmiths charge $20-$50 to install sights (according to my Googling, anyway), the XS Sights Glock Sight Pusher is probably going to pay for itself.
In all seriousness, either of these tools are a solid choice for an enthusiast, armorer, or gunsmith. Digging into the info about them, I noticed that service life is related to the slide and sight manufacturer. More specifically, other aftermarket sights and non-OEM slides with their varying tolerances can not only make some sights more difficult to install, but will accelerate wear on the sight pusher. Although XS Sights mentions a variable service life for that reason, it does seem as though the sight pusher is designed for easy replacement of some parts. To that end, if you manage to wear out the DIY Series™after 50-100 installs, you’ve gotten your money’s worth. At the same time, it’s possible they will have an option to rebuild the tool. I haven’t verified, just speculating.
But wait, that’s not all!
*As mentioned above, at the time of publication, the DIY Series™Glock Sight Pusher Kit bundled with the R3D Night Sights is on sale for $55 off! That’s like buying the sight pusher, and getting your set of sights for fifty bucks. Or buying the sights and having them throw in the tool for another $84. No matter how you look at it, it’s a good deal. And that’s for American-made steel sights with a 30 day satisfaction guarantee, and a No Questions Asked Warranty if the tritium stops glowing for any reason in the first ten years. As someone who dropped a brand new pistol and broke a rear tritium sight, I would have appreciated that kind of coverage from the OEM. Instead, XS Sights has my back now.
I’d like thank the folks at XS Sights for sending over their Glock Sight Pusher kits for me to try out, photograph, and share with our readers. This site is mostly about recreational shooting, and I do like to cover a lot of firearms customization. So they’re a great fit for our audience. Check them out at xssights.com.