Back in March, I posted the start of this project. This winter seemed endless, and I was bored. In that window between “too cold to shoot, but not warm enough to spend evenings in the garage”, I hatched a plan: Reshape and then refinish an OEM 10/22 stock. I’ve always enjoyed woodworking, but never thought much of the wooden stock that came standard on most 10/22 rifles. My plan was to do a little cutting and shaping, then refinish it. And maybe some laser engraving. Well, I got the first parts down, but the laser engraving didn’t happen. What did happen was I made an otherwise boring stock slightly more elegant. And then I changed up the barreled action to suit the new look. Read on to see how that went.
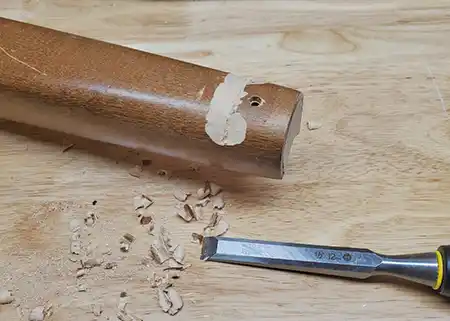
The first cut is the deepest
With a little inspiration from the Steyr Zephyr II, I came up with a plan. Cutting the end of the stock off just forward of the bipod stud was the first step. Then I took a chisel to it, in order to get that little undercut. I couldn’t go all-out in copying the Steyr, as there’s a limit to how much time I’ll spend on a stock that cost me $20. Instead, I cut it deep enough and then shaped it so that the support hand falls naturally and comfortably into this spot.
Sanding. So much sanding…
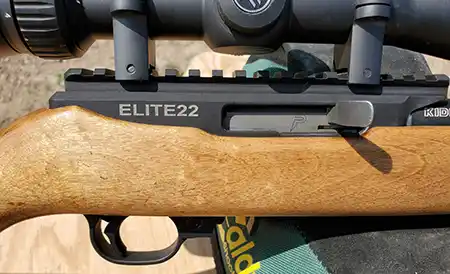
With the front of the stock modified, I went to work on the rest. In addition to opening the channel for the bigger barrel, I wanted a smooth look. So that crisp edge along the top of the stock got rounded. All the way past the charging handle, it’s much smoother now. Giving the same treatment to the cheek rest and butt portion brought it all together. Finally, I added a bit more taper to the front of the stock by sanding forward of the action’s takedown screw. It’s all subtle, but much more obvious when viewed next to a factory stock.
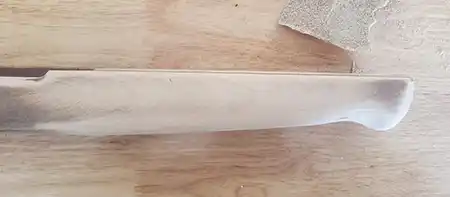
More sanding
Once the general shape I was after was finally achieved, it was just a matter of stripping the rest of the original finish. This was an older stock, and “They don’t make them like they used to”. It takes a lot of sanding to get down to bare wood. I generally try to sand by hand, for a few reasons. One, it’s easy to overdo it with an electric sander. Next, I wasn’t in any huge rush, since it’s a bit relaxing after a day at work. Finally, I can’t hear my music over power tools. This part could have gone faster, but it wasn’t terrible. Sanding by hand also allowed me to get a much better fit for the plastic butt-plate too.
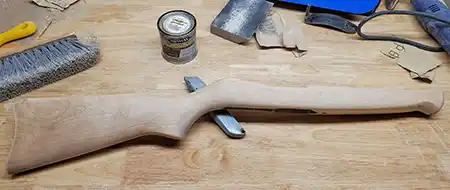
Time for stain. Also, joke’s on me.
When the sanding was all done, I grabbed a can of stain. I had planned on a nice brown shade, closer to walnut than what you see here. After three coats, it was still more blonde/oak than I would have liked. Shrugging to myself, I didn’t think much of it. Until about a week later, when I found an almost identical can of stain in a cabinet in my garage. This one was clearly darker. By this time, the applied color had already grown on me though. Making a note to myself to store them in the same place, I’ll try to avoid this happening again.
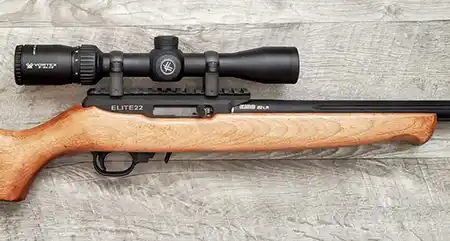
No laser engraving
As much as I am a fan of what can be done with a laser these days, I ended up skipping the engraving. I already had too much wrapped up in this project, and was running short on free time. Besides, I think the light color and matte metals work well enough together that it didn’t need more embellishment. If you disagree, feel free to comment below.
A few changes to the barreled action
The basis for this rifle is an aftermarket receiver, bolt, and barrel, with a modified Ruger trigger unit. As the project evolved, it became apparent that some changes were in order. Bright red triggers, charging handles, and magazine releases are fine for custom rifles. But they draw attention away from other details. Since I wanted this rifle to be all about the stock, I swapped a few parts out. So it now has a matte silver Pike Arms bolt, along with an OEM trigger and charging handle. Not huge changes, just a little more subtle.
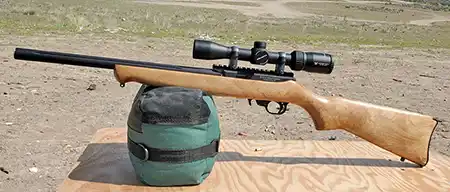
The end result
More than anything, this was an activity done mostly out of boredom. Yet with every similar project, I seem to learn something new. In this case, I have an even great appreciation for the design of rifle stocks. Changes, whether large or small, can definitely affect the overall look and feel of a rifle. This one doesn’t shoot any better or worse than it did before. Instead, it just feels a little better in hand, and in my opinion, looks much better than the typical OEM 10/22 stock. Even with my big hands, the narrower forend fits more naturally. And I love the smoothed edges.
My original stated goal was to incorporate a factory stock into a custom rifle, and I feel confident that I have succeeded. This newly finished stock definitely stands out compared to when it left the facory, without much expense beyond some free time. The best part is that anyone can do this with a few basic hand tools. Original Ruger stocks are cheap, and it’s a fun way to pass the time.
But wait, there’s more!
Usually, I’ll do a project like this, and then repurpose the parts for another creation at a later date. As I was writing up this article, I recalled a 22 Charger-length barrel in one of my spares boxes. After digging it out, it seems the perfect length for yet another blunderbuss. Since this receiver is an aftermarket one that was a pistol before I built it into a rifle, I’m fairly certain how this story will end. It’s just a matter of getting caught up on everything else, and then deciding if it’s time to make some more sawdust. Stay tuned.