The best Browning Buck Mark accessories can make a good pistol even better. The Browning Buck Mark already has a solid reputation for reliability, accuracy, and a better-than-average factory trigger, which is exactly why I focused on upgrades that improve the user experience instead of trying to reinvent the pistol. A few smart changes can make it easier to rack, faster to reload, more optic-friendly, and a little nicer to shoot without turning it into some drawn-out project.
To keep it simple, I went with parts from a single manufacturer and made sure they were all easy to install at home. No special tools, no gunsmithing, and no all-day commitment. The total time to install everything shown here was under an hour, and every one of these parts offers a practical benefit.
The Best Browning Buck Mark Accessories
If you are shopping for Browning Buck Mark accessories, these are the upgrades I would look at first. Some people also search for Browning Buckmark accessories, Browning Buck Mark upgrades, or Browning Buck Mark parts, but they are all looking for the same thing: practical improvements that make the pistol easier and more enjoyable to use.
- Best trigger-feel upgrade: TandemKross GearBox
- Most useful everyday upgrade: halo Charging Ring
- Best optic-ready upgrade: Marksman Sight System
- Best reload-speed upgrade: Titan Extended Magazine Release
- Best magazine handling upgrade: Buck PRO Extended Magazine Bumper
These are the exact upgrades I used on this pistol. Check current pricing and availability here: Browse Browning Buck Mark accessories at TandemKross.
Upgrading a Browning Buck Mark is easy. From the factory, they already have a pretty good trigger, so I was not looking to fix a bad pistol. I just wanted to improve the parts of the shooting experience I interact with the most. The TandemKross GearBox helps the trigger feel cleaner. Racking the slide is easier with a halo. The Titan extended magazine release makes reloads quicker. And the Marksman Sight System adds a very slick optic-ready setup with better iron sights at the same time.
The narrow base of the Buck Mark magazines also makes them a little harder to seat quickly with the heel of your hand, which is why I installed the Buck PRO extended base pads. To future-proof the pistol, I added the Marksman Sight System as well. This combines upgraded fiber optic sights with an optic plate that fits a wide range of optics. With the low mounting point and slightly taller sights, they can co-witness with many popular red dots. I also picked up the Essential Maintenance Kit, but this Buck Mark is still pretty much new, so I am not swapping those parts just yet.
First up, the GearBox Install
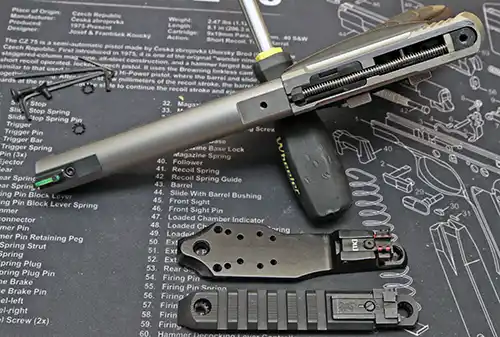
When it comes to installing my Browning Buck Mark accessories, I work from the inside out. This way I only have to take it apart once. That means the $29.99 TandemKross GearBox was first. Here is a link to the TandemKross GearBox installation instructions. The short version is to start by making sure your pistol is unloaded. Rack the slide, and remove the two screws holding the sight base. Pull out the firing pin housing and recoil assembly, then lift the slide up and off. Insert an empty magazine so you can pull the trigger to drop the hammer.
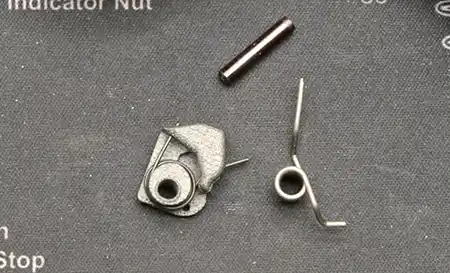
Use a punch to remove the sear spring pin, then flip it over, and the spring should fall out. Orient the GearBox and drop it into place. Replace the sear pin. I used a small screwdriver to release the captured leg of the spring, pushing it over and into place. If you watch a video on the “Heggis Flip,” you will see what a pain simply flipping that spring over can be. This yields predictable results without all the extra hassle. After carefully testing to make sure it was working correctly, I moved on to the magazine release.
Compared to the factory setup, the GearBox is one of those upgrades that improves the feel of the gun without turning into a major project. For the money, it is an easy recommendation.
Titan Extended Magazine Release Install
Another easy task, I chose to install the Titan Extended Magazine Release for Browning Buck Mark next. Long name, short installation process. Remove the right grip, and just behind the trigger is the flat magazine release spring. Lift the spring up and remove the complete one-piece OEM magazine release. Install the internal portion of the Titan in its place, with the magazine release spring on top. Then reinstall the grip panel.
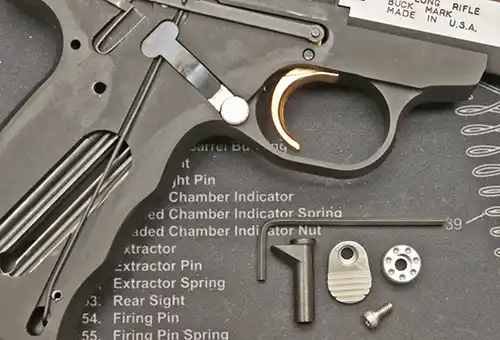
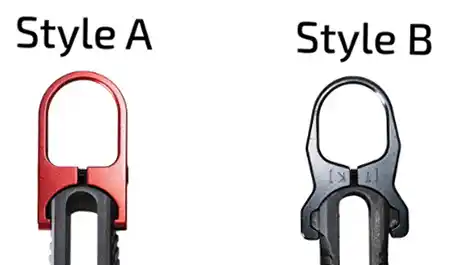
Flip your Browning Buck Mark over, and you will see the threaded post for the Titan where the old button was. Choose from the circular or oval button. For this one, I went with the oval. It was just a matter of threading the included screw through the button and onto the post with the included wrench. They are available in black or silver for $29.99 and red for $34.99. Since this pistol is stainless with dark wood grips, the silver provides some nice contrast.
This is one of those parts that makes more sense the more you shoot the pistol fast. The factory release works, but the Titan is quicker and easier to hit. Just make sure to function test it with your magazines after installation, especially if your pistol has different grips or other small changes from stock.
Marksman Sight System Install
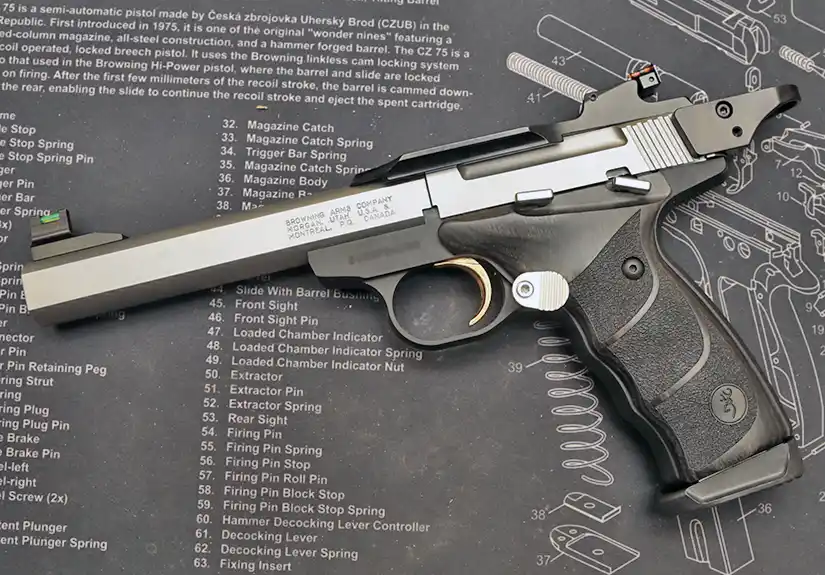
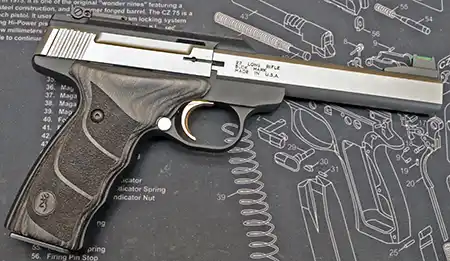
At $114.99, the Marksman Sight System for Browning Buck Mark is the most expensive upgrade here. But everyone who has shot my other Buck Mark agrees that it is absolutely worth it. The fiber optic sights make for fast acquisition, and the integrated optic mount is the real draw. It is compatible with more than 16 different red dots in both mounting pattern and the ability to co-witness when paired with the right optic. Since my factory Picatinny rail had already been removed, this was a simple install. Using the included hardware, I just carefully screwed it down in place of the OEM base.
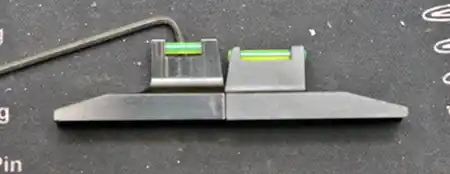
One final step of the Marksman Sight System install was to swap out the front sight. Though they look similar, the Marksman front sight is slightly taller. And it was another easy swap, since it is just a single screw. Off with the old, on with the new. While TandemKross includes a spare orange light pipe, I prefer the green front for better visibility and contrast. While the front sight is obviously fixed, you can see in the above photo that the rear is fully adjustable for windage and elevation.
If you plan to run a red dot on a Buck Mark, this is the one upgrade in this bunch that changes the pistol the most. It adds a better sighting system now and makes future optic choices easier later.
halo Charging Ring install
Pinching the slide of the Buck Mark to rack it is not especially difficult. But it is much better with the halo Charging Ring. Of all the Browning Buck Mark accessories shown here, this is the only one I feel is close to mandatory. If you do not want to mess with the internals of your pistol, that is fine. But the halo is an immediate quality-of-life upgrade. Young or old, weak or strong, wet or dry hands, it gives you a much better handle on the slide. TandemKross also offers a second option for the slide with the extra little “wings” too, so check fitment before ordering if you have an older or less common Buck Mark.
The halo slides on from the top of the slide. Position it so that it is about even with the top of the slide, and then alternate tightening the two screws a bit at a time. No need to get gorilla tight, just snug them both down. The goal here is to go slowly and evenly. It is not going to suddenly slide off, thanks to the grooves in the slide.
If you only buy one Buck Mark accessory, this would be my pick. It is simple, fast to install, and you notice the difference every single time you use the pistol.
Buck PRO Extended Magazine Bumper Install
Browning Buck Mark magazines are some of the best rimfire magazines I have used. They are thicker than most and feel a lot more durable. Out of the box, they seem to run smoother, too. But they can benefit from a wider base for quick reloads. So I add a TandemKross Buck PRO Extended Magazine Bumper to all my Buck Mark magazines. This may be the least essential of these Browning Buck Mark accessories, but it is still a worthwhile upgrade, especially if you do fast reloads or just want more to grab onto. They are currently $24.99 for a pair.

Another quick and easy install, just follow the TandemKross Buck Pro Basepad installation instructions. Basically, you place the nut in a holder and put that in the retaining clip. Both go into the basepad. Tighten from the bottom until the threads just start to catch. Then slide it onto the magazine from the rear. Install the magazine in the pistol to center the basepad, and tighten it down. No glue, no permanent modifications. Just a larger basepad that makes seating magazines faster and easier.
Essential Maintenance Kit Install
Although I have not swapped the parts for this pistol yet, the TandemKross Essential Maintenance Kit for Browning Buck Mark is exactly what it sounds like. It includes a Fire Starter titanium firing pin, Eagle’s Talon extractor, plus the extractor spring and plunger. If your pistol is older and showing some wear, this kit upgrades your ignition and extraction parts. I used them on a previous project, my Browning Buck Mark Mild Makeover. That link covers the installation.
If nothing else, these are great parts to have on hand. Odds are pretty good that some of the original parts get lost or misplaced during routine maintenance. So they are not just replacements for worn-out parts. Where I usually have multiple copies of different pistols, I prefer to keep spares for them. Gotta keep that fleet running.
The Sum of the Parts
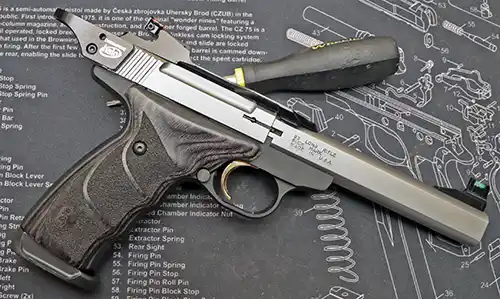
With these Browning Buck Mark accessories installed, every function of the pistol has been improved. It is easier to rack, easier to reload, easier to aim, and a little nicer to shoot. Trigger pull feels better, the sights are quicker to acquire, and the pistol is now set up for a future red dot without needing another overhaul later. There is no question that a stock Browning Buck Mark is already a good pistol. But these accessories make that good gun more capable and more user-friendly, which is exactly the point.
For another practical add-on, I also tested the COAST PTX35R rechargeable pistol light on a Buck Mark with an aftermarket rail. It is not a must-have upgrade for every Buck Mark owner, but for pest control, property use, or a nightstand rimfire setup, a compact pistol light can make sense.
As always, I would like to thank TandemKross for providing their parts for my projects. On their site, you will find more Browning Buck Mark accessories, along with plenty of other replacement and performance parts for rimfire and centerfire firearms.
Looking to get your own Browning Buck Mark? MidwayUSA carries over a dozen different models.
*To help people find this article, I need to point out that some people also searched for Browning Buckmark. Per the Browning website, the pistol is officially called the Browning Buck Mark.
User Experiences & FAQs
What Buck Mark owners tend to like most
- The Buck Mark already has a strong reputation for accuracy, reliability, and a better-than-average factory trigger, which is why most owners seem to focus on ergonomic and optic-related upgrades first.
- The GearBox gets a lot of attention because it is inexpensive, easy to install, and noticeably improves trigger feel without requiring a full trigger replacement.
- The halo Charging Ring is especially popular with shooters who want easier slide manipulation, including younger shooters, older shooters, and anyone who simply wants a better grip on the slide.
- The Marksman Sight System appeals to shooters who want a cleaner optic setup while keeping usable iron sights.
- The Titan Extended Magazine Release is a practical speed upgrade, but as with many small control parts, it is worth function testing with your own magazines and grips after installation.
FAQs (Browning Buck Mark accessories)
Which Browning Buck Mark accessory should I buy first?
If you only buy one, I would start with the halo Charging Ring. It is easy to install, easy to appreciate, and improves one of the most common Buck Mark complaints right away.
Is the GearBox worth it if the Buck Mark already has a decent trigger?
Yes. The Buck Mark already has a pretty good trigger from the factory, but the GearBox improves feel and consistency without turning the install into a major project.
Does the Marksman Sight System work with red dots?
Yes. That is the whole point of it. The Marksman Sight System combines improved iron sights with an optic mount, giving many popular red dots a lower and cleaner mounting solution. Always confirm footprint compatibility before ordering.
Are Buck PRO base pads worth adding?
They are not mandatory, but they are useful. If you like quicker reloads, easier magazine seating, or simply more to grab onto, they are a nice upgrade. If you want only the most essential Buck Mark accessories, you can save these for later.
Will the Titan extended magazine release fit every Buck Mark perfectly?
It fits a broad range of Buck Mark pistols, but it is still smart to verify function with your own magazines, grips, and setup after installation. That is good practice any time you change a control part.
What if I have an older Buck Mark?
Check fitment carefully before ordering, especially for slide-related parts such as the halo Charging Ring. Some older Buck Mark variants use different slide details, so a quick compatibility check can save frustration.
What is the best maintenance-related upgrade for an older Buck Mark?
The Essential Maintenance Kit is a smart one to keep on hand. Even if your pistol is running fine, replacement ignition and extraction parts are never a bad idea for a rimfire you plan to keep shooting.