Browning Buck Mark Mild Makeover

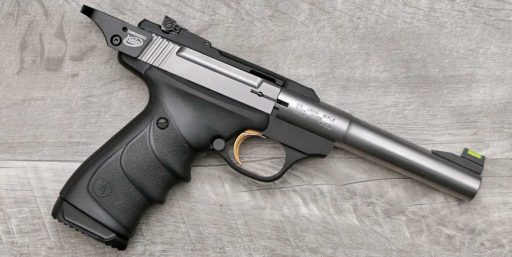
Late last year, I picked up my first Browning Buck Mark. Since I already had a few Ruger Mark IV pistols, and a S&W SW22 Victory, it seemed like it was time to complete the trifecta. The model I got is the Camper Stainless URX. This model comes with their usual alloy receiver, and an attractive matte stainless finish. It almost looks like nickel. The tapered bull barrel is unthreaded, which is a bit disappointing. And the overmolded ambidextrous grips don’t look so great, but feel pretty good in hand. What sold me on it was the nice (for factory) trigger, and their Pro-Target adjustable sights.

Stock Browning Buck Mark on the operating table, ready for upgrades

With its “good enough” trigger, bright fiber optic TruGlo front sight, and an unthreaded barrel, I had some tough decisions to make. I could go all-in, replacing the barrel and adding an optic and mount, as well as new internals and trigger. That would easily double my cost, and I would have another “Steel Challenge race gun space gat”. Or I could just leave it stock. Well. we know I’m not likely to leave something stock. In the end, I decided to add a few things for reliability and ease of use, while keeping it mostly stock. These modifications are the first and best ones I would recommend for a Buck Mark owner. More importantly, they are simple enough that anyone with basic tools and skills, and a little patience, can do on their own. No gunsmith required.

Halo Charging Ring for the Browning Buck Mark

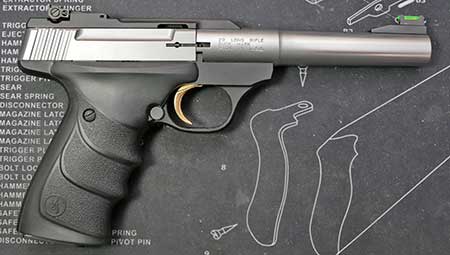
I’d like to meet the person who doesn’t use a Halo on their Buck Mark. Of the “big three”, the Buck Mark has the narrowest slide. My big hands and fingers don’t fit so well between the grips and sight. Pinching it is not ideal, but at least it doesn’t pinch back. Of course, the benefit of that slender slide is the Halo is also very narrow. It’s the least obtrusive one I’ve used, but the loop is still big enough to get one of my fat fingers into. I always install the Halo first, as chances are that most other operations are easier with it on there.

TandemKross Halo charging ring for the Browning Buck Mark

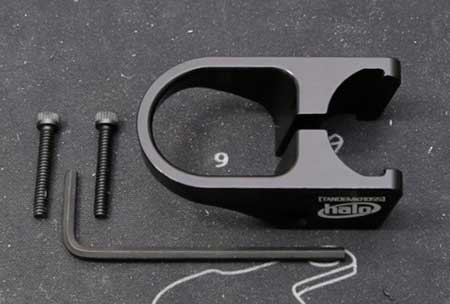
Installation of this lightweight aluminum ring is pretty easy. Remove the magazine, and lock the slide back. Confirm the Buck Mark is unloaded. Slide the Halo down onto the rear of the slide. Make sure it’s centered on the slide, and neither too high nor too low. Install the two cross bolts, and tighten until they are just snug. At that point, I alternate between the two, tightening them evenly about a quarter turn each. Once done, all that is needed is a quick function check to make sure it’s not interfering with normal operation. Now it’s far easier to chamber a round, clear a jam (which I hope to avoid), and lock open the slide to render the pistol safe. At $49.99, consider it money well spent. Find it here.

TandemKross Halo charging ring for the Browning Buck Mark, installed

The next three items are easier to do in the order shown below.

TandemKross Eagle's Talon extractor, Fire Starter titanium firing pin, and Striplin Eliminator stainless recoil guide rod for the Browning Buck Mark
TandemKross Eagle’s Talon extractor, Fire Starter titanium firing pin, and Striplin Eliminator stainless recoil guide rod for the Browning Buck Mark

Eagle’s Talon Extractor for the Browning Buck Mark

Factory extractors are almost always stamped steel. This is done to keep costs down. They usually last through thousands of rounds, but wear out eventually. Along the way, they can be responsible for failures to extract. Annoying when shooting for fun, and unacceptable in competition. I always replace my OEM extractors with aftermarket ones. The Eagle’s Talon is machined from hardened tool steel, and has a sharper hook than the factory part. This helps to pretty much eliminate any extraction issues. For just $11.99, it’s cheap insurance. Find it here.

TandemKross has a simple instruction sheet with easy to follow instructions, including photos. As always, remove your magazine, then grab your new Halo charging ring, and pull the bolt back until it locks. Verify that there is no round in the chamber. I use a dental pick to pull the plunger back, and just pluck the extractor out with some needle nose pliers. Then it’s just a matter of pushing the plunger back with the new extractor. It may take a few tries, but it just sort of pops into place. Check to make sure there is a bit of wiggle, and it’s good. Some people may find this easier with the bolt removed, but I prefer this way, as I can check the function by racking the slide a few times, before moving on to the next part.

Firestarter Titanium Firing Pin for the Browning Buck Mark

Let’s be honest about something. The days of 3-4 cents per round .22LR ammo are over. I haven’t stooped to ammo that comes in a bucket, or has “Golden” in the name, but I’ve become far less picky about my general use ammo. Which means that sometimes I just hear a click, instead of a bang. While I can’t verify the claim that a titanium firing pin reduces lock time, I do know that they seem to provide more positive ignition. So for $22.99, this firing pin pairs with the extractor to increase reliability. Find it here.

Installation is bit more involved, as the bolt assembly does need to be removed. TandemKross provides great instructions here. Note that they recommend a gunsmith perform this. So read the instructions, and determine your comfort level with this. I found it quite easy. After again verifying that the firearm is unloaded, remove the two bolts holding the rear sight. The recoil assembly needs to come out to access the firing pin, which work out well if you’re replacing that too. A single cross pin retains the firing pin. Removing that allows the firing pin to come out. Pay attention to the orientation of the pointy side, and install the Firestarter in its place. My instructions are simplified a bit, since I linked to their document. Next step is reassembly, or replacing the guide rod, then reassembly.

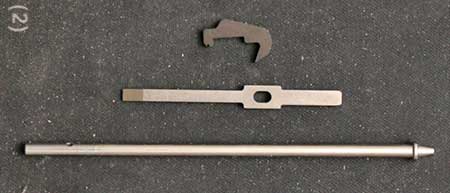
Eliminator Buck Mark Recoil Guide Rod by Striplin Custom Gunworks

TandemKross has collaborated with some well known names in the industry, including Striplin Custom Gunworks. That makes it easy to get both quality brands in a single order from one website. This $22.99 stainless guide rod has two advantages over the OEM part. First, it eliminates the C-clip. No need to worry about losing that part, when it’s completely replaced. Second, the polished stainless construction should run with less friction. If you’re always looking for an edge, here’s another way to improve cycling and reliability. Find it here.

It would take me probably half an hour, and several hundred words, to cover the installation. So instead, I’ve embedded the video. If you’ve already done the extractor and firing pin, this is the last step as part of reassembling it all. Check out the video below, and see how easy it is. Patience, eye protection, and maybe a large clear plastic bag so you don’t lose parts, are really all you need.

Green Springs Magazine Springs for the Browning Buck Mark

I’ve covered ignition and extraction, now it’s time to step backwards, and make sure rounds get into the chamber in the first place. First, I’ll point out that Browning magazines are not inexpensive. And I guess they only ship one with each pistol. But if you compare them to their Ruger and S&W counterparts, you’ll understand why. They are finished much better. No need to polish or de-burr. Easily the smoothest function, out of the box. The only thing they could use is a stiffer spring. Green Springs are $9.99 for a pack of three. And when compared to the factory part, they are about an inch longer. For new or worn magazines, they improve feeding. Find them here.

TandemKross Green Springs magazine springs and Buck Pro extended magazine bumpers for the Browning Buck Mark

TandemKross has another excellent installation video for this. My method is a little different, but the important thing is eye protection. Springs are under tension, things have a tendency to take flight. I use a long, ball-end allen wrench to compress the spring pressing on the follower. Then I push out the follower button. Care needs to be taken, otherwise it’s easy to launch the wrench into space. Maybe their way is better. Then I feed the spring back in, use the wrench to compress it, and push the follower button back in. Sounds easy, but I’ll admit to sending a follower across my office more than once. The result is the same smooth action, but with some extra force to make sure rounds are ready to get stripped and chambered.

Buck PRO Extended Magazine Bumpers for the Browning Buck Mark

Browning’s flush fit magazines may function smoothly, but they don’t load as well as I would like. Ideally, I could just push one in, and seat it with the heel of my palm. Because they are flush mount, this isn’t always ideal, and I’m sure it’s worse under the pressure of a timer. Adding a bumper that sticks out ensures positive seating every time. These Zytel bases look almost factory, have cutouts for easier removal, and don’t require any modification of the factory magazine base. For $24.99, you get a pair of very cleverly designed bumpers. Find them here.

Installation is both easy and intuitive. I’ll admit that I skipped their excellent video, as it just made sense from looking at the parts. I’ve embedded the video below, and the 2:39 of video is pretty close to how long it will take, once you understand the process. Having installed similar products on other magazines, I’ll go on record a second time to point out how clever the design is here. Easily my favorite magazine bumper to date. Unlike some others, there is a bit of fore-aft adjustment when installing them, so you get the perfect fit.

Range time

After these modifications, my only range time was indoors, as it was cold and snowy. Even with cheap bulk ammo, this Buck Mark ran boringly reliable through  a few hundred rounds. Accuracy was great, which was expected, as I hadn’t done anything that would affect it. At 25 yards, I’m happy to keep all my rounds in about a 3-4 inch group, as the steel gongs I use are usually that size for pistols. That’s not slow fire, it’s more “dueling tree” speed. Which is exactly what this pistol will probably get used for the most.

The sum of the parts

Browning’s Buck Mark is something of a premium pistol. I love all my rimfires, but the Browning’s design, fit and finish is a bit higher across the board than their competition. Sure, it’s priced accordingly. Yet that doesn’t mean it can’t be improved upon. The Halo makes it easier to work the slide. All the internal parts I added improve overall reliability. And that extends to the magazine springs. The bumpers improve loading too. Although I have only had a single outing with the new parts installed, everything functioned flawlessly, which is what I’ve come to expect from TandemKross uprgades.  I’ve made this good gun great. Or maybe a great gun even better.

Other options, and why I haven’t installed them*

TandemKross offers a few other upgrades for the Buck Mark that I know are worth the money, but I’ll save them for another project. First up is their Victory trigger. I do love the flat face design and adjustable over-travel. But as mentioned, the factory trigger seems pretty nice right now. And I like the gold. That’s also why I skipped the Gearbox on this project. This drop-in part simplifies the trigger function, and offers a lighter pull. I’ll see how my OEM works after another thousand rounds or so. Finally, their Titan extended magazine release is great for dropping the magazine during quick reloads. But it sticks out a bit too prominently for some of the field holsters I use, and will eject magazines unexpectedly. Ideal for competition use, maybe not so much for hiking.

I’d like to thank TandemKross for providing the parts for this Browning Buck Mark “Mild Makeover”. There’s nothing better than taking an American-made firearm, and making it even better, with American-made parts. And they’re covered by a lifetime warranty.

*By the time this was published, I had gotten a second Buck Mark, and went a little crazy on both. So look for an update to this one, along with details on my second one, coming soon.

IndustryOutsider is supported by its readers. When you purchase through links on the site, we may earn an affiliate commission. Read more here.
0 0 votes
Article Rating
Subscribe
Notify of
guest
1 Comment
Oldest
Newest Most Voted
Inline Feedbacks
View all comments
Tom Molik

How to modify a Buck Mark case to allow for a Halo. Thx. The Halo is great.

1
0
Would love your thoughts, please comment.x
()
x