Several weeks ago, I was browsing our local classified ads for another rifle. I found one I was interested in, and the seller even mentioned that he might consider some 10/22 parts in trade. Well, I didn’t buy the rifle. And the 10/22 parts I had available were not what he was interested in. Trying to be helpful, I sent him a link to one of my articles. Turns out that was sort of an inspiration for his first 10/22 build project, as he had seen it mentioned on reddit a few times. Since he was local, I offered to help get that project going for him. We put together a shopping list, and agreed to meet once all the parts were acquired. Assembling a custom 10/22 is not difficult, but can certainly go smoother when you’ve done a few.
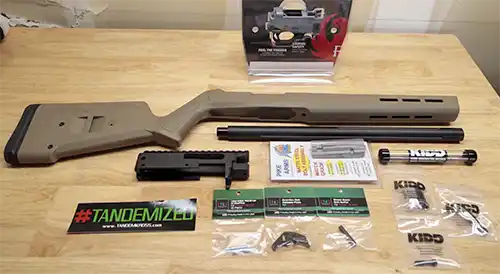
His parts list:
It’s easy to spend a lot on a custom 10/22 rifle. But some parts strike a balance between quality and value. If you’re not building a precision rifle, no need to go overboard. So here’s a list of quality parts that perform great, without spending a small fortune.
- Tactical Innovations Elite 22 receiver and match bolt
- Acculite 22 fluted and threaded barrel
- Magpul Hunter X-22 stock
- Ruger BX trigger
- KIDD charging handle, v-block, screws, and takedown screw
- Leupold 4×28 rimfire scope with Leupold rings
- TandemKross KrossPins, Guardian Bolt Release, and Shockblock Bolt Buffer
Assembly
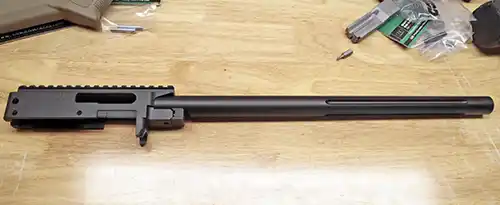
While I was swapping the factory bolt release for the TandemKross Guardian, he set to work on the barrel. Acculite makes their barrel shanks slightly oversized. They include some emery paper to sand it down a bit, for a perfect fit. In this case, the Elite 22 receiver with the new Cerakote finish was a bit too tight. So the barrel’s shank got some minor sanding, and careful fitting. Between the tight fit of the Cerakoted receiver and the non-captured spring of KIDD’s charging handle, installing the bolt was a bit of a challenge. But he got it installed and verified the barrel/extractor timing. With that looking good, the v-block screws were snugged down.
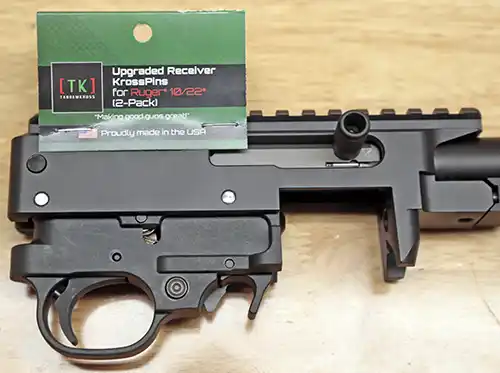
You wouldn’t think that Cerakote could make that much of a difference, but it does. The Shockblock buffer took a little effort to get into place. And then the KrossPins, which usually go right in, required a little extra tapping with a makeshift punch. If this was my rifle, I would probably spend some time polishing out those holes. But I don’t expect he’ll be taking this rifle apart as often as I disassemble some of mine. Once the barreled action was complete with the trigger group installed, it was dropped into the stock. From there, we installed the scope rings and placed the scope in them. Final installation and adjustment of the scope was going to be done later.
Range report
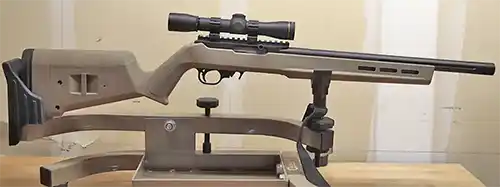
On its first outing, he put 150-200 rounds through it with zero issues. This does not surprise me at all. The parts he chose all work together well, and should make for a great plinker and suppressor host. There are no groups to share, as the only ammo he had was some copper-washed Winchester. But that tiny, 7-ounce, 4×28 Leupold scope should hint at the fact that precision is not the goal here. This is a light field rifle, not a heavy bench rifle. It’s made for fun. He’s going to source some other ammo anyway, just to see what it’s capable of.
Crunching some numbers
When it comes to the “buy or build” question, I respond with a question: “Do you want one, or two rifles?” Because if you buy a stock rifle, chances are you’re going to upgrade it piece by piece, and eventually have two. It’s a bit easier on the budget to do this over time, despite costing more in the end. My custom 10/22 rifle was over $1,000 with an OEM receiver. This one came in at $793 before shipping costs, and another $325 for the scope and rings. So it’s over $1k on this one too. As mentioned, it’s easy to spend a lot more, or even a little less. Especially when it comes to the optics. A small reflex sight or larger magnification scope could send the cost up or down a few hundred dollars either way.
Conclusion
My first 10/22 cost me $99. I can’t say how much my last custom 10/22 cost, as my wife reads this. Lol. But it shouldn’t ever really be about cost. To me, value is more important, as long as the rifle offers acceptable accuracy and reliability. If a rifle meets your needs and your budget, you can’t ask for much more. Which is what we have here. It’s a light, reliable, and accurate rifle that nearly anyone would be happy to own. Especially as a first 10/22. The owner seems very pleased with it, and that counts more than opinions or anything else.
As enthusiasts, we must support each other. I created the original article referenced above as a guide for anyone interested in upgrading their 10/22. Because that rifle is comprised of what are individually some of the most popular and common upgrades. No, it may not be everyone’s ideal, but most custom 10/22 rifles have at least one of the non-OEM parts included in my build. To actually meet someone who wanted to closely emulate that rifle validates those choices. And I’m happy that I got to be part of helping someone’s build go from a plan to reality.
I have many of the mods mentioned in this article including the Magpul stock, but opted to polish my hammer and seer to a minor finish with a kit from M-Carbo vs the BX trigger. I’m using the stock receiver still as well. I opted for a KIDD bull barrel,TK Krosspins, a budget TruGlo optic and rings which are tightened to infinity due to it moving, and a Ruger suppressor. All in all a very fun gun that can take down many varmints with ease.
Quietly. 🙂