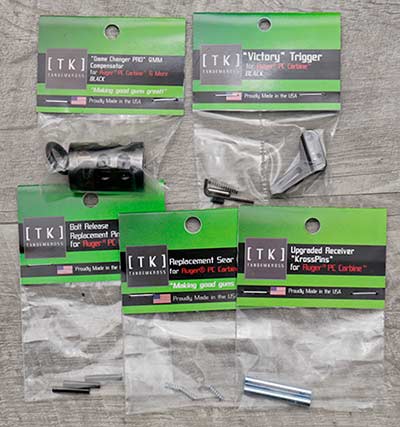
Last month, I upgraded my PC Carbine with the Upriser chassis from TandemKross. I also received their “Internal combo”, along with a few other parts, which I installed at the same time. Now that I’ve had sufficient trigger time, I can report back on the those upgrades too. The parts in question are listed below, with pricing, installation info, and some commentary.
Game Changer Pro 9mm Compensator
At 1.5 inches long, and just under 1 inch wide (.99″), this 2.83 ounce steel muzzle device can offer some performance advantages. A little extra weight, plus the venting of gases at 45 degrees should minimize muzzle rise. On my heavy carbine, I didn’t really notice much of a difference though. So the obvious solution is to install it on my PC Charger instead. Expect to see it covered more in-depth when I write about the Charger modifications. In the meantime, the reviews on the TandemKross website all seem favorable.
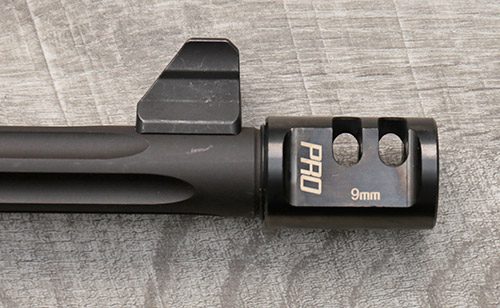
To install, simply remove the factory thread protector, and twist this on. An included O-ring, much like a crush washer, makes it easy to time to the barrel. If you’ve got a 9mm handgun or PDW threaded 1/2 x 28, it looks to be a good choice for shooting fast and flat. MSRP $59.99
Victory Trigger
This is one part that I am very familiar with. All three of my Ruger Mark pistols have them, and two of my 10/22s do as well. For good reason. I never thought I would like a flat trigger face. Seems that I was missing out. It’s got an aggressive texture, and the wide face makes for consistent finger placement. Before spending money on a trigger job, I’d install one of these. It improves the feel and pull enough that unless I was competing, it’s all I need.
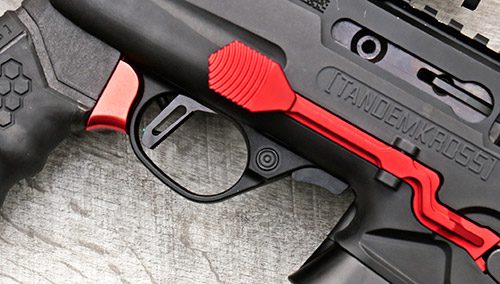
Installation is super easy, especially if you’ve ever worked on a 10/22. TandemKross even includes a slave pin. It’s pretty much a drop-in replacement for the original factory part. Then use the included wrench to adjust out all but the last drop of over-travel. You’ll need to leave a bit for the trigger to reset correctly, but that’s a function of the loose tolerances in the original design, not the trigger itself. End result is a much better trigger feel that’s not too light for general range fun and defense. MSRP $49.99
KrossPins Receiver Pins
Factory pins are designed to fit very tightly into the receiver, and need to be punched in and out. KrossPins are designed to be nearly as tight, but with a spring-loaded ball detent. This holds them in place until you want to remove them. And all that takes is a push with a punch, not a tap with a small hammer. Trigger group or bolt maintenance just gets easier with them. As an added bonus, they don’t fall out, and they don’t roll away when on the bench either.
I’m pretty sure that every 10/22 I own has a set of KrossPins in it. That’s because they are constantly being taken down and having parts swapped out. Are they as critical in the PC Carbine (or Charger)? Maybe, maybe not. If you rarely disassemble your rifle or Charger, they may not matter to you. But if you’re all about regular deep cleanings, these are for you. And if you run a suppressor, which can send blowback into your receiver, then definitely get some. For the price, they’re certainly worth adding. MSRP $9.99/pair
Replacement Bolt Release Pin
As someone who hadn’t given their PC Carbine a thorough cleaning, I was initially unsure why I needed these. But as soon as the factory pin fell out during disassembly, I understood. This is not a maintenance part or performance part. Like the KrossPins, its function is to eliminate a nuisance. In this case, swap out the loose factory pin for this snug pin. If you do manage to lose one during cleaning (unlikely, unless you’re in the field), the package includes three.
Replacement is as simple as pushing the factory one out, if it hasn’t already fallen out, and installing this one in its place. It’s just a little added insurance, and I don’t mind having spares, since it’s not like we can find these at our local gun shop or hardware store. MSRP is $9.99/3-pack
Replacement Sear Springs
Another “insurance” part. Much like the “Oops kit” I’ve seen for the AR-15, these springs are nice to have on hand. One of the tiniest firearms parts, yet a failure turns the whole thing into a paperweight. Drop one in while replacing the trigger with your Victory trigger, or throw them in your box of important spares. Either way, the very inexpensive pack of three will be priceless when that factory spring fails. MSRP $6.99/3-pack.
Conclusion
Installing these parts was easy, and educational. Doing so gave me a better understanding of the internals of my PC Carbine. It’s a simple yet robust design. Mostly because it’s a scaled up 10/22, which has been around for decades. The Victory trigger provided a definite, noticeable improvement. I expect to be able to say the same thing when I install the Game Changer Pro on my Charger. As for the other parts, they just make maintenance easier, but also give me that extra confidence which having spare parts on hand can provide. Let’s be honest – if you have spares, things don’t fail. Check them all out at TandemKross.com.
I’d like to thank TandemKross for allowing me to test and review their parts and accessories. Their continued support of the shooting sports community is appreciated.
Comments? Questions? Have any of our readers tried out either of these PC Carbine/Charger upgrades? Feel free to share below.