Most of my projects start with a single component and a concept, and then I source the parts to make it happen. In the case of my Crazy Ivan Comp Lite project, I really wanted to do a “July 4th” build. I had gotten a deal on a silver 12″ WhistlePig barrel, and knew I wanted to make a “red, white, and blue” Charger. So the search began for a way to make it a reality. As luck would have it, Karl at Crazy Ivan agreed this would be a cool project, and hooked me up with a gunmetal grey Comp Lite chassis. I dug through my spares, placed an order with Tactical Innovations, and a couple weeks later, it was complete. Unfortunately, the chassis arrived on July 3rd, too late for me to do a review and publish it on the 4th. So here it is, a little late, but worth the wait.
The Comp Lite Chassis
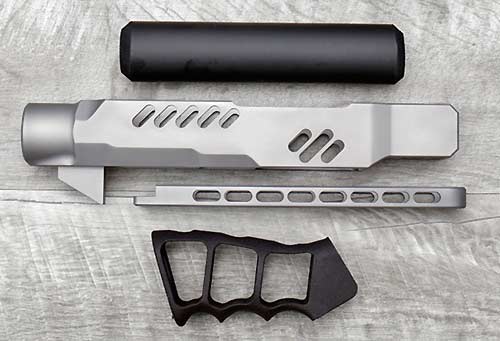
As expected, this chassis starts off as a billet of 6061-T6 hardened aluminum alloy. Everything you don’t need is machined away, leaving you with an 8.4oz chassis. Even at that low weight, it’s got some smart features. A weight-saving set screw eliminates the need for a castle nut on your receiver extension. An accuracy-improving adjustment screw provides a second mounting point for the receiver (more on this later). It’s got a grip spacer to make a smooth transition from an AR style grip to Ruger trigger guard. There’s a cap for the front, if you don’t want to use a handguard.
This is my 4th chassis, and the level of detail is very thorough. Heck, there’s even a nylon keeper, so you don’t lose the takedown screw. As far as tolerances go, it has a snug, but not too tight, fit. My Tactical Innovations receiver fits like it was machined alongside the Comp Lite chassis. It’s also finished extremely well. No burrs or rough edges, and the color is even throughout.
What’s included
Of course, you get the chassis in your choice of color. Currently, that’s black or gunmetal grey. But more colors are on the way. Also included is a set screw for the receiver extension. And the adjustment screw that locks your receiver in place. Plus the grip spacer for either Ruger or Volquartsen trigger groups. With that grip spacer is a grip screw and washer, which is a bit shorter than an AR grip screw. As mentioned the takedown screw has a nylon keeper, so it doesn’t fall out. And if you’re not adding a handguard, there’s a stub plug (plastic insert) with hardware. Finally, simple instructions that even I could follow. A bargain at $169.00.
Extras
For this project, we added the $39 Nylon12 skeleton pistol grip. It’s very light, at 1.45oz, and extremely durable. Plus it just looks and feels great. Although I wanted a lightweight pistol, I included the M-LOK rail as well. On the bottom there are 3-1/2 M-LOK slots. It only adds 1.8oz, but gives me 6.5″ of space ahead of the chassis, without grabbing the barrel directly. For a rifle build, this allows mounting a forward grip or bipod. CNC-machined from 6061 T6 aluminum, it’s a $55 option for black, or $65 for gunmetal grey.
Should I decide to go even lighter, I can remove that rail, and use the foam barrel grip instead. They’re designed for anyone looking to lighten things up even more. Made from smooth-skin NPVC foam, it’s comfortable and tough. While the standard length is 6.5’³ Karl can cut it to fit your application. Just ask. With their inside diameter of 0.875’³ it installs on a .920 barrel with ease, but doesn’t slip off. Outside diameter on the standard grip is 1.375’³ and on the chubby grip it is 1.775’³. Either one is $10.
My build list
In addition to the Crazy Ivan components listed above, I used a variety of mostly aftermarket parts. The receiver is a Tactical Innovations Elite22™billet aluminum receiver in “Stainless” clear. My 12″ fluted, threaded WhistlePig barrel is attached with a stainless v-block set, also from TI. Inside, I swapped a JWH Custom bolt out of another rifle, since it’s got the American flag engraving. Below that is a standard Ruger trigger housing, but it’s got a few upgrades. TandemKross provided the red Victory trigger, KrossPins, and bolt release. **Note that WhistlePig is now known as Acculite22.com.**
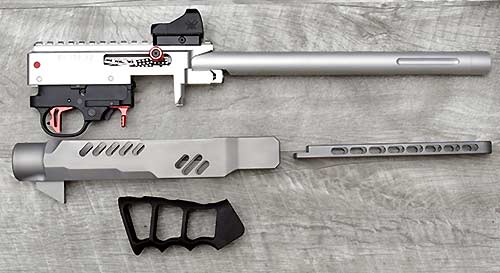
To add a little color, there’s a Tactical Innovations red charging handle, magazine release, and buffer. I tried a different aftermarket charging handle in blue, but it was out of spec, and dragged. Stick with known brands. The receiver extension and KAK Shockwave blade are black now, but I have plans to swap them both out for either red or blue at a later date. And I took the Vortex Viper off my wife’s 22/45, until I can get one of us a suitable replacement (don’t tell her).
Assembly
After making sure that the firearm is unloaded (twice), installation is straightforward. The stub plug goes in first, but I installed the rail in its place. Four screws and that was done. Next was the takedown screw. A washer goes between it and the chassis, with the nylon retainer holding it inside the chassis. At this point, you’re ready to install the barreled action.
Drop the action into the receiver, and tighten the takedown screw, but not all the way. Add a drop of blue Loctite to the adjustment screw, and insert it through the hole buffer tube hole in the rear of the chassis. Snug it up to the receiver, but not too tight. Loosen the takedown screw, and make sure receiver comes out. If not, adjust the rear screw as necessary. Then a buffer tube/receiver extension can be threaded in. Thanks to the set screw, a castle nut is optional. Finally, install a grip with the included 3/4″ screw and washer.
Everything went together very easily. Other than having to heat the receiver in a toaster oven for 20 minutes at 200 degrees to fit the barrel to the receiver, this was all a very smooth process. End result was a firearm that weighs just 3.625 pounds, and balances nicely.
Range time
I took my new firearm, a lot of ammo, plus my nephew and a good friend, to our favorite outdoor shooting spot. It’s on public land, so everything has to be packed in and out. Unfortunately, we forgot to bring the steel targets. While I did have some Caldwell Orange Peel targets, this build is more about speed than precision. So the only groups I shot were to sight in the red dot. From there, we all just blasted away at empty cans and shotgun shells at various distances.
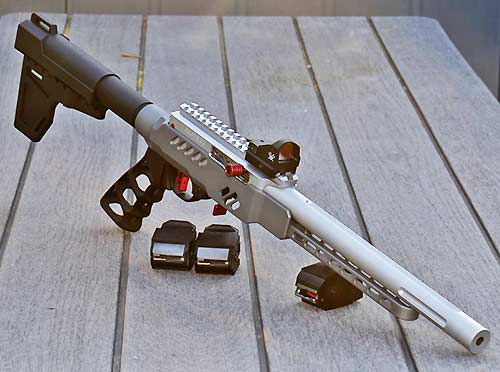
After a couple of magazines, I was reminded why I like the Charger format so much. Actual pistols are okay, but braced Chargers are the most fun. Watching a can fly into the air, only to get set in motion again as soon as it hits the ground, is so satisfying. Lining up empty soda cans at different distances, and hitting them in rapid succession is more fun than standing still and shooting tiny groups. Balance was fantastic – even with the 12″ barrel and full magazine, it was biased to the rear. The rail provided just the right amount of grip, with a little extra room. And the grip itself was comfortable, with the finger grooves fitting my big hands just right.
Conclusion
Whether for competition, hunting, or just fun plinking, the Crazy Ivan Comp Lite chassis is a great foundation for any build. In Steel Challenge, where you’re swinging from target to target, its low weight is a benefit. It’s quick to get going, but just as easy to stop once on target. Competition not your thing? How about a lightweight hunting rifle you can carry all day without fatigue? That should be an easy build. Same with the plinker in either rifle or Charger configuration. I’m betting I could get it closer to 3 pounds with the right parts. At that point, even little kids of appropriate maturity can shoot it with ease. And the upcoming color options will make it even more fun to go full custom.
I can’t find a fault with the Comp Lite. It’s priced slightly above its lowest competitor, making it one of the least expensive on the market, but weighs nearly 4 ounces less. It’s got features and options not found on other chassis’, at any price. It provides a secondary mounting point for the receiver, without spending extra money on a receiver with a tang. All the actual weights matched the advertised weights, exactly. And the customer service is great. Karl and I probably exchanged 20 emails to find the right options and colors for this project. He’s enthusiastic, and definitely a “gun guy” as much as he is a businessman.
I‘d like to thank Karl at Crazy Ivan LLC for supplying his chassis and accessories for this review. If you‘d like more info on their products, or to get your own chassis, head over to crazyivanllc.com.
Comments? Questions? Have any of our readers tried out the Crazy Ivan chassis’? Feel free to share below.