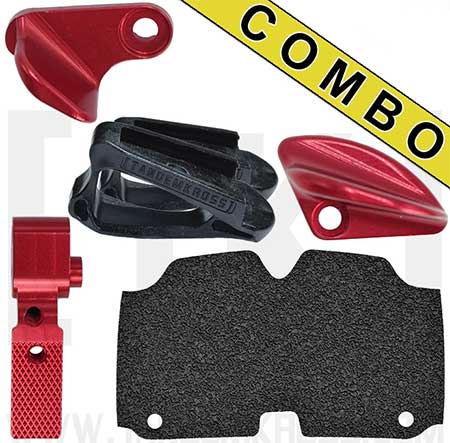
Not long ago, a friend asked why I didn’t have a KelTec CP33. Being a fan of rimfire pistols, it was a valid question. So I got one. And then I reached out to TandemKross to help me make it better. Because having 33 rounds on tap is nice, and absolutely dominating our friendly dueling tree competitions is nicer. Conveniently, TandemKross makes an “Everything Kit” for the KelTec CP33 as well as its cousins, the CMR30 and PMR30. It has all the parts needed to turn this pretty good pistol into something great. Here’s a breakdown of how things went.
An Important Note About the KelTec CP33 Upgrades and Accessories Kit
The kit is no longer available, but the CP33 accessories available from TandemKross can be found here. While not all items shown in this article are available on the TandemKross website, you may still find them in stock at local retailers.
“Victory” Trigger
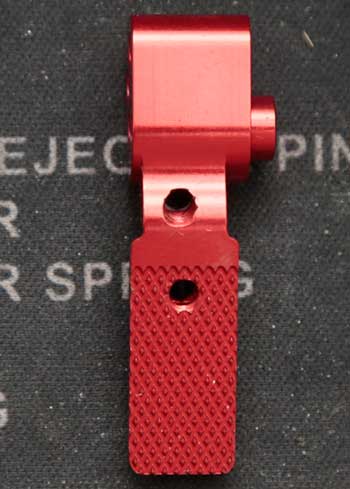
If you’re doing the whole kit, you’ll want to start with the Victory trigger, as it requires splitting the CP33 down the middle. So no sense installing the other parts first. You’ll notice that it’s very nicely made, and adjustable for both pre and post-travel. There’s the usual flat face with plenty of texture, but’s it’s much more minimalist looking. I’ve actually got these on quite a few other firearms, and really like them.
Honestly, I like the looks of the CP33’s better than some of the other versions. As usual, they are offered in red or black, and I got the red. Bling! Oh, there’s also a tiny wrench included for adjusting it, as well as the other wrenches and odd bits needed for installation.
While I highly recommend this kit, the trigger install might not be for everyone. Bill doesn’t lie in the video – it’s the most difficult one I’ve done as well. But it can be done, it just takes some patience. I went over parts of the video twice during the install, and total time was probably 40 minutes. Here’s the installation video.
“Cornerstone” Safety Thumb Ledge
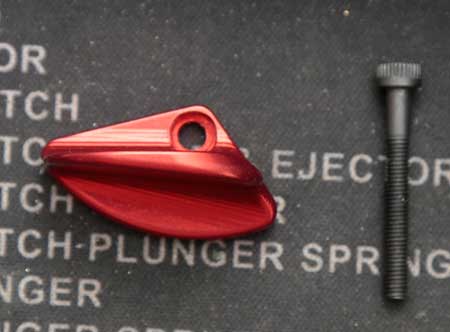
With that out of the way, I was all psyched up to install the Cornerstone Safety Thumb Ledge. Generally, any oversized safety is a welcome addition. One that works as a thumb rest is even better. It’s a nice big 1911-style safety, machined from aluminum. It provides the perfect rest for the right thumb. And it prevents the safety from being engaged by accident during competitive shooting. Available in red or black, I almost always choose red because it photographs better for my articles. Either color complements the KelTec CP33 though.
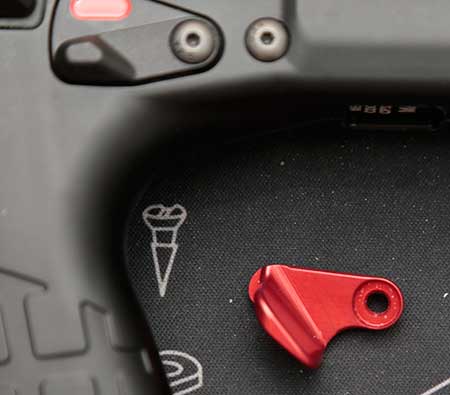
Installation is ridiculously easy. Remove the left side screw holding the safety in and pop out the safety. Pay attention to the interface between the safety and the internal mechanism. Attach the Cornerstone and tighten it down. Verify that the safety functions properly. I do like that there is room underneath to shoot with a traditional grip, for those that don’t want to use it. I just don’t know why anyone wouldn’t.
“Accelerator” Forward Thumb Ledge
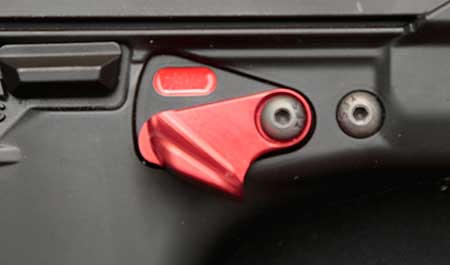
As long as I have two thumbs, a forward thumb ledge (gas pedal) is also appreciated. This keeps my left (support) thumb pointed forward. Not only does it make for a better grip, but it keeps the CP33 on target more naturally. The only downside to installing it is that it does need to be removed to remove the slide, as it captures the takedown pin. Another aluminum piece offered in red or black, I got the red for reasons that are now obvious.
No permanent modifications are required, and installation only took a few minutes. Using the provided 2.5mm wrench, remove the screw below the takedown pin. Push the takedown pin from right to left so that it sticks out a bit. There’s a cutout in the Accelerator for the takedown pin. Slide that into place. Run the included extended allen screw through the Accelerator and tighten it down. The ten minutes it takes for both thumb rests more than makes up for the difficulties you might encounter doing the trigger swap.
“SuperGrips”
If you want honesty, here’s honesty. The KelTec CP33 “grips” leave a lot to be desired. It’s like someone heated a Glock grip, before flattening it out a bit into something even worse. And then topped it off with a few minutes in a waffle iron for some ineffective texturing, while leaving the rest of the surface slick and smooth. So the SuperGrips offer a bit more texture and better gripping surface.
You’ll never unsee the factory gripping area, but these will improve the grip. But wait, why is there no photo? I’ve installed these on my PMR30, and am very familiar with the process. I’m holding off a bit while I research a few other options. These are good, but if I can get rid of the waffle texture completely, I’ll be happier.
Installing is just a matter of obsessive cleaning with alcohol or a little dish shop, then slapping it on, sticky side down. The key is to make sure the CP33 is thoroughly degreased in the grip area and then properly dried before starting. Line up the hole in the grip on one side, and then wrap around to the other side. Heat with a hair dryer to conform to the grip. In the unlikely event you decide that the naked factory grips are somehow more desirable, they peel right off.
“Maverick” Extended Magazine Bumper
Just to be clear, this doesn’t extend the magazine capacity. If the 33 rounds of the KelTec CP33 isn’t enough, there are options to hold more though. But magazine swaps for the KelTec CP33 will never be fast or graceful. The Maverick just makes it easy to remove a magazine, and only remove it intentionally. It’s got a little handle for tugging, which also helps when seating it. With about three times the capacity of most rimfire pistol magazines, swaps probably don’t happen as often anyway. But this makes them less awkward.
While this is the last upgrade it’s also one of the easiest. Because they just replace the factory baseplate. Push down on baseplate plunger, and slide off the baseplate. I stuck a small wrench through the magazine body to compress the spring while I did this. And then slide the Maverick on in place of the old baseplate. That’s it.
Bonus item: “Game Changer PRO Squared” Compensator
This isn’t included in the kit, but I requested one for the KelTec CP33 because I have found that they do offer advantages. For competition, they act as a “loudener” so the diminutive report of a .22 can be picked up by the shot timer. But when it comes time to go head to head on the dueling tree, a stainless compensator can provide a small edge. It assists with balance, and also helps keep the muzzle on target. Not a night and day difference, but when lunch is on the line (tacos), I don’t like to lose.
When shooting with friends, I often mount a suppressor on the 1/2 x 28 threaded barrel, so I appreciate the easy installation and removal. TandemKross designed this compensator with angular lines to complement the modern aesthetic of rimfire pistols, such as the squared and blocky CP33, setting it apart from traditional round compensators.
If you can turn a wrench, you can install this. Comes with a rubber donut and thin washer to help time it.
The sum of the parts
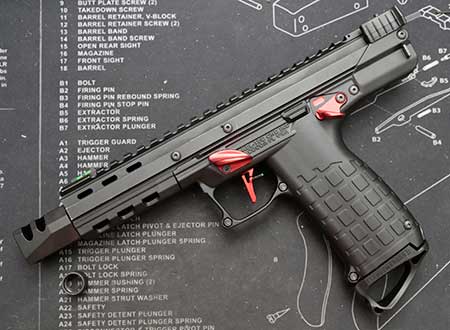
With all these parts installed, the KelTec CP33 is still not an attractive pistol (in my opinion). But the shiny red bits make a noticeable difference in how it handles. And I’ll take function over form any day. As mentioned, it points naturally with both thumbs forward, although the factory safety placement doesn’t put the right thumb in the ideal location. It’s still a bit far back, but I can get a much better grip now, and it’s not like recoil is a concern. The trigger, which wasn’t terrible, feels more positive and my finger placement is probably more consistent too.
And the magazine bumpers help with those infrequent reloads. Not that I would need to strip a magazine quickly, but the plastic mags in the plastic body aren’t built for speed. Overall, the TandemKross “Everything Kit” for the KelTec CP33 makes it a more formidable competition pistol. Or a much more fun plinker. Now if only there was a way to improve the aesthetics…
As always, I’d like to thank TandemKross for providing their quality, American-made parts for my testing and evaluation. Without exception, it’s fun to see a gun go from good to great with a few simple additions. Whether for competition or fun, they’ve got the parts to make our favorite firearms perform their best.