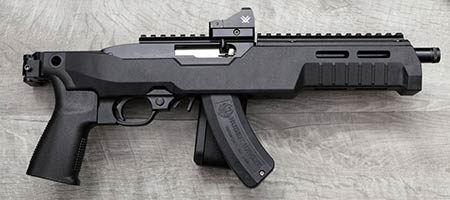
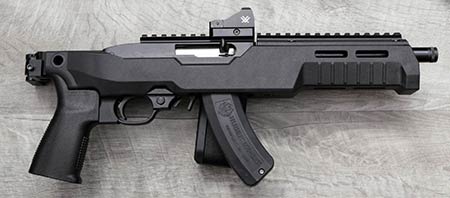
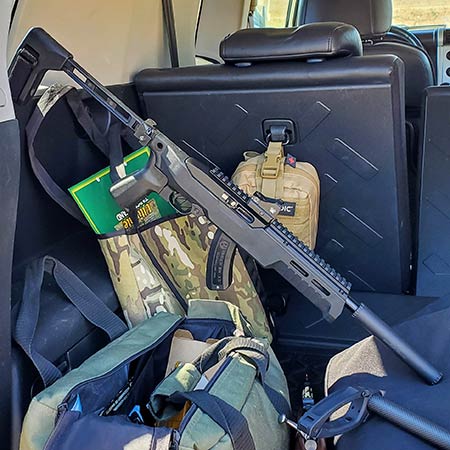
When I first saw the SB22 Fixed Kit from SB Tactical, there was no question that I’d need to get one. I’ve had a completely stock 22 Charger since last October. This barreled action drops right into this lightweight polymer chassis perfectly. The rear Picatinny rail makes the SB22 Fixed Kit chassis ideal for a 22 Charger (often mistakenly referred to as the 10/22 Charger), though you can use it on either a pistol or rifle. Combining the 8″ barrel with a folding brace yields a compact little plinker that’s fun to shoot.
Find the best price on the SB22 at Brownells!
SB22 Fixed Kit
As the $124.99 MSRP might suggest, this chassis is polymer, not machined aluminum. It does have an aluminum insert though, which should aid in rigidity. Overall length is just 15 inches, and it’s 1.5 inches wide for most of that length. Weight is 17 ounces, putting it very close to the Ruger factory piece, but with some design improvements that certainly justify the price.
Features
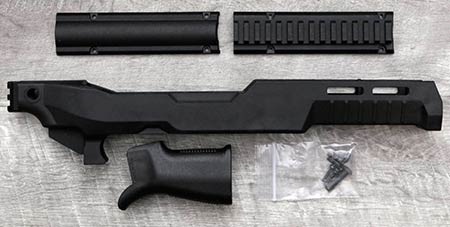
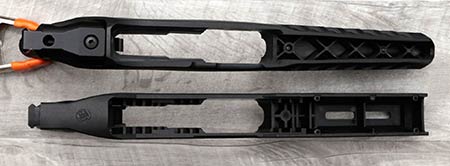
The chassis itself has a rear Picatinny rail section for attaching a brace or stock. Just ahead of that rail is an ambi sling QD sling socket. SB Tactical molded a nice recessed handguard into the front It’s got 6 M-LOK rails, with two each at 3,6, and 9 o’clock. SB Tactical includes two covers for the area over the handguard. Choose from a curved but smooth flat top cover or a Picatinny bridge mount when assembling the chassis. As an added bonus, SB Tactical even includes a Reptilia COG grip. Any AR-pattern grip should fit, even some with beavertails.
Find the best prices on new and used Ruger 22 Chargers at Guns.com
Assembly
My factory receiver dropped right in with no surprises, and is held in place by a single screw, just like OEM. I chose the Picatinny bridge mount over the flat top cover, more for aesthetics than anything else. It’s attached with four small screws. Since the Reptilia grip is included, I went with that, even though it’s not my ideal grip. Completing the assembly was an SB Tactical SF1913 brace, which I will fully cover in a separate article. At that point, I topped it off with a Vortex Viper red dot, and after a quick laser zero, it was ready to go.
Fit, Finish, and Ergonomics
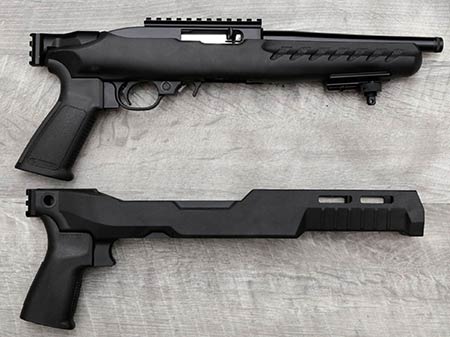
As mentioned, my OEM receiver dropped right in. There’s always a little bit of fiddling with the safety, but that’s normal. Any gaps around the action are tight and uniform, with no wiggling. Up front, the handguard cutout provided a good gripping area. Although the trigger guard to chassis, and grip to chassis fit were great, I did have one concern there. On the section that works as a spacer between the trigger guard and grip, the edge was a bit hard. I’d prefer to see that transition have a smoother radius, and may give it a little contouring at some point. It’s not terrible, but could be better. Otherwise, it’s very comfortable to carry and shoot.
Critical Observations
The chassis design centers the barrel laterally, but results in a slightly high position. It’s so high, the Picatinny bridge has a recess cut into it. That’s also why the “flat top” piece is actually curved as well. A .920″ would be a tight fit on the top, with more space underneath. That’s a concession that had to be made to fit the rail. A 10/22 patterned firearm has the barrel high in the receiver. So this is an issue with all chassis systems, as there is limited room when trying to design a rail over the barrel that lines up with the factory rail on the receiver. But SB Tactical made it work well for their SB22 Fixed Kit.
Because the bridge is held in place by four screws which thread into the polymer chassis, I do have some reservations about mounting an optic on it. Removing the rail for maintenance or cleaning could affect the zero. So I just mounted my optic on the receiver, as far forward as I could, which is where I usually place them.
If you do a full takedown and cleaning after every outing, this is something to consider. The other issue is the M-LOK slots. They are probably fine for a rifle build. For a Charger, my hand covers all but the right side’s forward slot. I’ve got no need to mount any accessories, so it’s not an issue for me. Just something to keep in mind if you’re into handstops, lights, and lasers.
Find the best price on the SB22 at Brownells!
Range Time
This certainly isn’t my first chassis, but even with the low MSRP, I had some high expectations. And the SB22 Fixed Kit did not disappoint. It maintains the same light weight of the factory chassis. And there’s a more natural gripping area for the support hand. In my opinion, it looks better too. With the brace providing a cheek weld, shooting was fun and comfortable. A slightly taller red dot, or small riser, might work better for some shooters, as I had to bring the brace up pretty high to get good alignment. Keeping empty cans dancing until they were out of range (or the magazine was empty) was certainly easy enough.
Note that with an 8″ barrel, my support hand’s thumb was less than an inch from the muzzle. This wouldn’t be a concern with a barrel of 10″ or more, but if you have a short barrel, then either a compensator or suppressor might be a good idea. Well, a suppressor on a .22 is always a good idea. Speaking of suppressors, I don’t see this setup working well with a shorter 4.5″-6″ barrel and suppressor. There just isn’t enough room inside. In other words, if you’re not using it on a rifle, then consider an 8-10″ barrel as the minimum for a Charger.
Conclusion
Market forces have turned the notion of rimfire being “cheap fun” on its head. In my younger days, we’d grab an $8 brick of ammo for an afternoon of shooting. That brick is closer to $50 or more now. You can buy the 22 Charger for around $300. Budget at least another $100 for a simple reflex sight. From there, it’s easy to spend $250+ on an aluminum chassis system. And that doesn’t even include the grip, stock, or brace. So they’re anything but cheap.
Yet SB Tactical managed to provide an alternative chassis at a reasonable price. I’ve seen the SB22 Fixed Kit sold for as low as $99.99, making it a really good deal. If you’re looking to upgrade your 22 Charger or 10/22, give it a look at sb-tactical.com. Note that they also make one for the Takedown models. That’s another win.
I buy and pay for much of the gear I review, but companies provide some gear for testing and evaluation. So I’d like to thank SB Tactical for sending their SB22 Fixed Kit for my review. I really enjoy the opportunity to try out innovative, American-made products that make shooting more fun.
Find the best prices on new and used Ruger 22 Chargers at Guns.com
Comments? Questions? Have any of our readers tried out either of the SB22 chassis’ yet? Feel free to share below.
User Experiences & FAQs
Real Shooter Experiences
- Many builders on Reddit (r/1022 and r/22lr) praise the SB22 Fixed Kit for being an affordable, lightweight way to chassis a 22 Charger or 10/22. They call it a solid value for the price.
- Forum posts on RimfireCentral and AR-15 community threads note the easy drop-in fit for many Ruger barreled actions, with only minor safety/fit fiddling required on some builds.
- Owner reviews on dealer pages (Brownells, OpticsPlanet) and editorial previews (American Rifleman, GunDigest) highlight that the kit’s aluminum insert helps rigidity and that the included Reptilia grip and covers make it a turnkey upgrade at a low cost.
- YouTube first-looks and build videos show fast installs and several users preferring the SB22’s ergonomics and handguard layout for short-barrel Charger builds — often combined with a TF1913 brace and compact red dot.
FAQs (SB22 Fixed Kit – fit, mounting, and use)
Will my Ruger 22 Charger receiver drop in easily?
Most users report a smooth drop-in with a single retaining screw – expect minor fitment checks around the safety and take your time aligning the action before final torquing. (Community reports: Reddit & RimfireCentral.)
Is the top Picatinny bridge stable enough for optics?
The bridge is polymer-mounted with four screws into the chassis; some builders prefer mounting optics directly to the receiver to preserve zero after repeated removal. If you plan to remove the bridge regularly, consider a receiver-mounted optic.
Does the chassis free-float the barrel or will the cover touch the barrel?
Several hands-on reports and forum threads note the top cover can sit fairly close to the barrel and may touch on some receivers; if free-float is important, check clearance or modify the cover slightly. The fixed kit’s design centers the barrel high, which is why the top cover has a curve/recess in some builds.
Is the M-LOK handguard useful on a Charger build?
The SB22 includes M-LOK slots but many Charger users end up covering most slots with their support hand in pistol-length builds; M-LOK is handy for rifle builds, but may be less useful on short Charger setups unless you want handstops or small accessories.
Will this work well with an 8″ barrel and suppressor?
An 8″ barrel fits the kit well and gives comfortable hand placement; tight short barrels (4.5″–6″) may not leave enough room for a suppressor or compensator without modifications. If you intend to suppress, test clearances first and consider the route of mounting the optic on the receiver to maintain sight height with cans attached.
How durable is the polymer construction at the low MSRP?
Despite the polymer body, the included aluminum insert and overall design make it a sturdy, light option – owners repeatedly report good field use at the price point, with the caveat that heavily abused truck-gun use may benefit from higher-end aluminum chassis.
Any assembly tips?
Use medium threadlocker on small bridge screws if you remove optics or the bridge often, check receiver-to-chassis gaps during dry fit, and test function thoroughly (safety, ejection, and mag seating) before live fire. A small riser or taller dot may help eye alignment with the brace installed.
Impressed with fit/finish, SBR group very accurate @ 30-50 yards (consistent 5 shot 1 hole groups off tri-pod) but have not shot for accuracy in this chassis. Quality looks very good, ordered a chassis for rifle,
This chassis is one of the best values for the 22 Charger or a light 10/22 build. Less expensive than aluminum, and you don’t have to worry about it taking a beating.