If one Browning Buck Mark is good, two must be better. At least when it comes to rimfire pistols. I like to have a couple of different options with each, and my Browning Buck Marks are no exception. The first one was supposed to get a mild makeover. That meant a few new parts, but nothing fancy — just a few practical Browning Buck Mark upgrades to make it easier to use and more reliable. And it didn’t take long before it got a Tactical Solutions Trail-Lite barrel upgrade too.
So it’s no surprise that I went all out on the second one. Barrel, internals, trigger, Halo, optics plate, and a red dot. Now I get to choose between irons and optics, and so much more. If you’re upgrading a Browning Buck Mark, I’ve also taken a closer look at the TandemKross Marksman Sight System and the Outer Impact Browning Buck Mark Red Dot Mount.
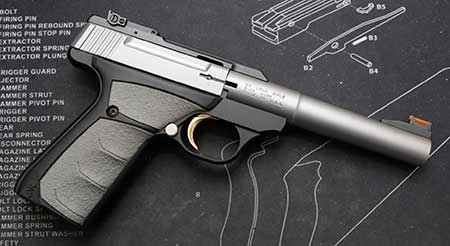
The Browning Buck Mark Base Pistol
Originally, this was a stainless Buck Mark Camper, of the UFX variety. It was reliable, accurate, and maybe a bit heavy. Sights were good enough, but since my other one had iron sights, I felt an optic was due. Also, these pistols come with really nice triggers. But I wasn’t going to let that stop me from upgrading to something better. There aren’t a lot of aftermarket grip options, which is fine too, because they fit my hand well. So what we have (had) here is a perfectly okay pistol that most rimfire enthusiasts would be happy to own and shoot. Not a single complaint about it. Let’s change everything!
Internal Fire Control Goodies
Since I already covered the TandemKross Eagle‘s Talon extractor, Fire Starter titanium firing pin, and Striplin Eliminator stainless recoil guide rod installs, I am going to skip them. You can find them here though.
The one new internal part that I didn’t already cover is the TandemKross GearBox. This is a sear spring with its own little housing. They’ve made it into what is essentially a drop-in part that’s super easy to install. Here’s Bill showing how it’s done. You’ll find it on the TandemKross site here, for a very reasonable $29.99.
TandemKross Victory Trigger for the Browning Buck Mark
I’ve got a variation of the Victory trigger on several different firearms, and really like them. My other Buck Mark had a factory trigger, but after upgrading this one, I went back and swapped that one out too. Random trivia: My S&W SW22 Victory pistols do not have TandemKross Victory triggers. So no Victorys for the Victorys. Anyway, this flat-faced trigger with adjustable over-travel is the perfect complement to that GearBox. Even better, for only $49.99, it’s also an easy install.
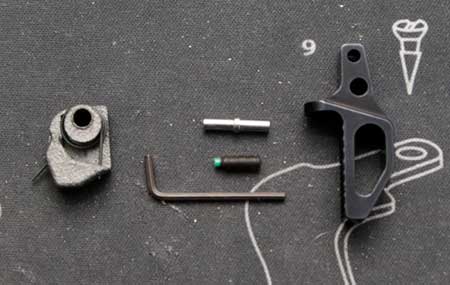
Once again, I defer to the TandemKross installation video. Note that this video may be old, as the included upper pin has a shoulder on it, which makes this idiot-proof. Yes, I did it correctly on the first try. And the cool part is that none of those parts fly out across the room when you take it apart. The most difficult part is wrestling the grip back on without things falling out.
Tactical Solutions Trail-Lite Barrel Upgrade
First up was the barrel swap. As I browsed the TacSol website, I saw their Trail-Lite barrels in a “Gun Metal Gray” that almost matched the grips of my Buck Mark. Really, it didn’t matter how close the color was; I ordered one. It was $299 for the 5.5″ version. Since I had to take the barrel off anyway (not true, just a lie I told myself to justify the expense) to swap internals, I might as well upgrade it. Better prices on these barrels can be found at MidwayUSA as well as Brownells.
In all seriousness, though, the Buck Mark is a great pistol and balances pretty well. But I do prefer lighter barrels. And I wanted to see how well they work suppressed, so a threaded barrel was always in the cards. In other words, off it went.
Barrel Installation
I could have just linked to my previous Buck Mark article, where I did a barrel swap. But I’ll save my readers the trouble and explain the process again. Make sure it‘s unloaded and that there is no ammo in the work area. Lock the bolt in the open position. Remove the front and rear sight base screws, and take off the sight. Find the barrel screw at the front of the frame, ahead of the trigger. Back that out, tilt the barrel down, and lift it out.
Clean every surface in sight, then install the TacSol Trail-Lite in the reverse order. Tighten it down completely, which means snug, not gorilla tight. Reinstall the front sight if necessary. Make sure there is no gap between the bolt and the barrel, then perform a full function check. If I can do it, anyone can.
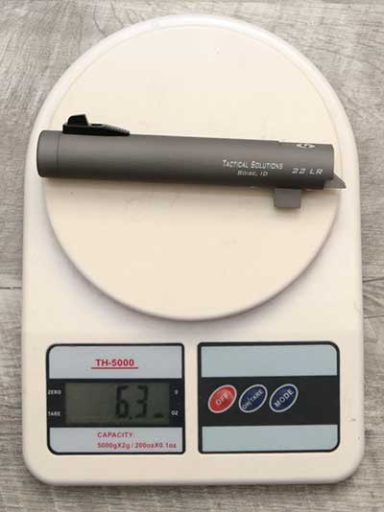
Unlike the last time, I actually weighed both barrels. OEM stainless barrels weigh in at 13.1 ounces. Tactical Solutions’ Trail-Lite barrel comes in at just 6.3 ounces, for a total savings of 6.8 ounces. With optic mount, optic, and an empty magazine, the entire pistol only weighs 26.5 ounces. That big fat stainless, non-threaded barrel weighs nearly half of what the entire pistol weighs now. While I understand that weight isn’t everything, and is sometimes a benefit, if you want a lighter pistol, there is a lot to be saved by swapping out the barrel.
A Few Other Things
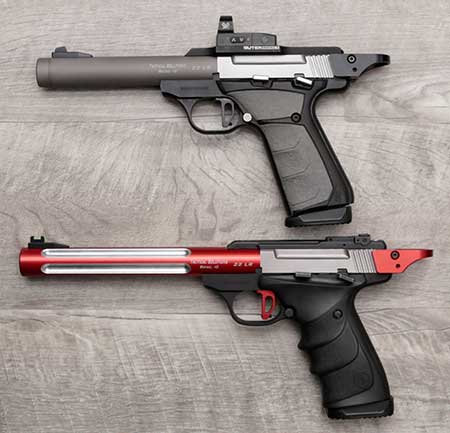
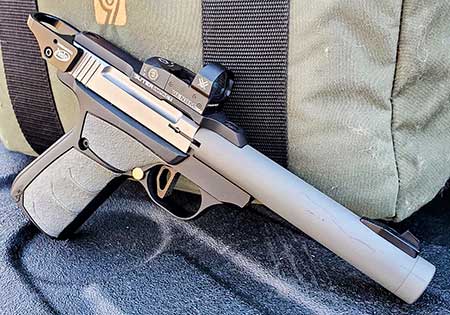
I forgot to mention the installation of the TandemKross Halo charging ring, but that was also covered in a previous article. So it’s got new internals, a new barrel, and a new trigger. Next step was to top it off, literally, with an Outer Impact optic mount so I could install a Vortex red dot. No one asked, but yes, I do love me some Vortex. This got the Venom 3 MOA, which four of my other pistols wear so well. I covered that mount in a separate Outer Impact Browning Buck Mark Red Dot Mount review. Here are both pistols, in their final form.
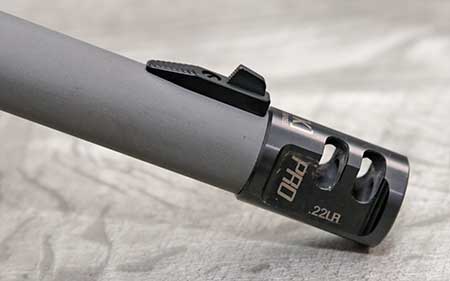
I’ve also been trying out the TandemKross GameChanger Pro compensator. This is the steel model, and it seems to add just the right amount of weight back to the end of the barrel. If I were carrying this pistol in the field, I’d leave it off. But for our friendly competitions, it does improve the balance a bit. More importantly, it plays well with my new shot timer, unlike some other rimfires. Sure, it looks cool too. But a quick comparison with and without it confirms that the Buck Mark handles better with it on. So maybe dropping a half pound of barrel weight wasn’t without some compromise.
Range Time
Who am I kidding? This is a Browning Buck Mark, modified with some great aftermarket parts. It ate all the ammo I fed it, which was mostly cheap Federal bulk, along with some Blazer, and even a box or two of Cascade. Yes, it works just fine with CCI too. But that’s expected. Even though .22 ammo is now reasonably easy to find and as cheap as 7 cents per round, I still need to make sure I can use the least expensive ammo.
We’re shooting a dueling tree and steel gongs, not punching holes in paper. And this Buck Mark ran great, no matter what we put through it. Totally reliable. The trigger, combined with the GearBox, makes for an outstanding combination. There is still a bit of play in the trigger, but it breaks crisply and predictably.
Popular Browning Buck Mark Upgrades
The Browning Buck Mark is an excellent rimfire pistol right out of the box, but a few simple Browning Buck Mark upgrades can make it even better. Two of the most useful upgrades I’ve tested are the TandemKross Marksman Sight System, which combines fiber optic sights with a low-profile optic mount that can co-witness with many red dots, and the Outer Impact Buck Mark Red Dot Mount, which supports a wide variety of optic footprints.
Conclusion
Really, I would have been just fine with a stock Buck Mark, or two. But they are so much better with the upgrade of a few key parts. And they make a great base for a custom build. This pistol definitely shines when it comes to being fun and competitive. If you already own a Buck Mark, you know there’s not much to complain about. Yet, it’s easy enough to make some small improvements that improve reliability and accuracy. And really, it looks better than the plain stainless models.
If you have an opportunity to pick one up at a fair price, I definitely recommend it. They’re good right out of the box, and great with just a handful of aftermarket parts.
As always, I’d like to thank TandemKross for supplying some of the parts used in this project. These are pistols that get used nearly every weekend by new and somewhat experienced shooters, and their continued support is helping get new enthusiasts into the sport.
Note: The pistol is officially called the Browning Buck Mark. However, many shooters search for it as the Browning Buckmark, so both spellings are referenced here to help readers find the article.