KRG states that the KRG Bravo 10/22 Chassis is “For that dream build you‘ve always wanted”. Well, I already had what I consider to be my 10/22 “dream build“. Or maybe, the most accuracy I could afford, based on my skill. Because I could certainly spend more, but I don’t think I would shoot any better. This gave me complete confidence in my rifle. Yet it wouldn’t hurt to try for a little more accuracy as well as comfort. Since I was going to be doing another build to test out a barrel, then the best possible chassis was a smart inclusion. So, I contacted KRG for a testing and evaluation copy.
Kinetic Research Group KRG 10/22 Bravo Chassis details
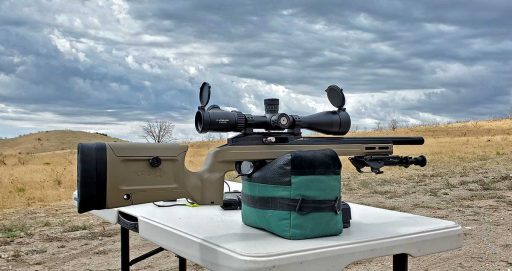
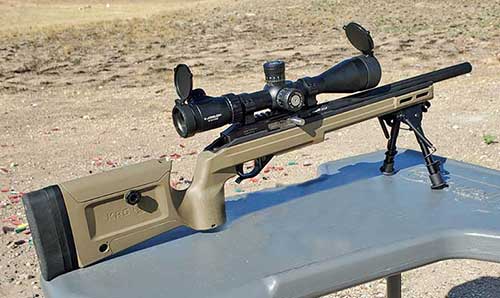
Rigidity starts with the full-length aluminum backbone running from the action right up to the tip of the forend. Encasing it is a polymer housing, available in FDE (AKA Tactical Peanut Butter, or tan), Crimson Red, and Stealth Grey. One of the advantages of this polymer construction is that it eliminates heat transfer between the shooter and rifle at the contact points. Another advantage of the construction is the weight-to-stiffness ratio. Weight for the chassis is 2.4 pounds, and it’s as stiff as a frozen weasel. Nominal length is 27 inches at the minimum 11 inch length of pull. Adding spacers will increase that length, with the LOP max at 14 inches. It accepts barrels up to .920″ in diameter.
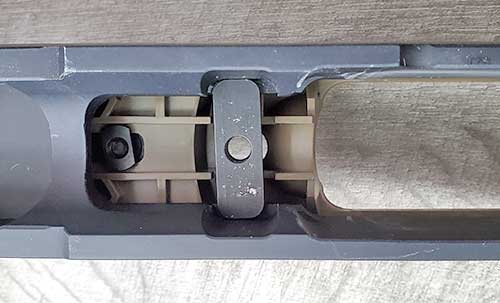
When I looked inside, I found what I believe is a key factor in this chassis’s ability to improve accuracy and consistency. Between the aluminum backbone and polymer bed of the chassis is a steel block. On the floor of the chassis is another block. The receiver’s action screw passes through both before threading into the receiver. This provides for a very stable mounting surface. With the receiver snugly in place, it’s a substantially rigid installation, with the barrel free-floating. That’s probably the equivalent of bedding the action in a wooden stock, but a lot less work.
KRG 10/22 Bravo Chassis features and accessories
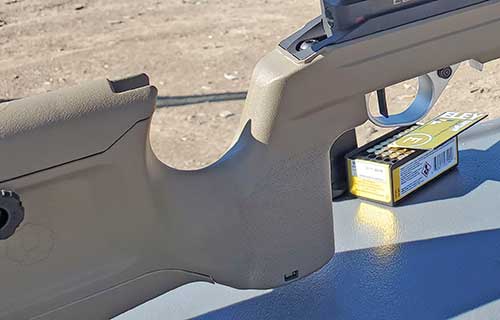
This chassis checks all the boxes for me. M-LOK slots at 3 and 9 o’clock, and along the underside. It can mount L2 Pic rails, an Arca rail or plate, a barrier stop, bipod, or Skittles dispenser. On either side of the butt stock are some mounts for QD cups. A meaty grip is part of the design too. It’s got storage inside, but a screw needs to be removed, making it somewhat inconvenient. Making up for that is a nice shelf for my thumb, as I shoot with it on the same side as my trigger finger.
I appreciate the Harris bipod stud too. And the Bravo will accommodate KIDD receivers with or without the rear tang screw, but not the CST style tang.
Options include a spigot mount for getting your bipod all the way up front. There are fastener kits, as well as LOP spacers and extension kits. Tool-less buttpad and LOP options are available as well. An inexpensive hook-style cover fits the bottom of the buttstock too. Between these and the QD cups plus M-LOK slots, this is a very modular design that allows users to customize it to their exact needs and applications.
KRG Bravo 10/22 Chassis user adjustments
Each chassis ships with a .75-inch LOP spacer. Without it, the length of pull is approximately 11 inches. Optional 3/8 inch spacers allow a length of pull up to 14 inches. They did include the kit for me, as well as a nice rubber recoil pad with the KRG logo. The cheekpiece does not require tools to adjust, with up to one inch of travel. No clicks, no notches, so it’s easy to get it to the exact desired height.
Installation
Installation should be familiar to anyone who’s taken apart a 10/22 before. Remove the magazine, clear the rifle, and double-check that there isn’t a round chambered. On the Bravo’s action screw is a small green rubber o-ring. Take that off, and remove the screw. Center your safety, angle the action into the chassis, and slide it back. As simple as that sounds, it’s actually a very tight fit, so it may require a bit more effort, but the two aftermarket receivers I tried (CST and Tactical Innovations) fit perfectly. Tighten the action screw to 20 in-lbs, per KRG’s instructions.
If you’re one of those shooters that vary the torque to see if you get better results, use this as a starting point. With the action screw going through a metal block that the receiver rests on, I’m not sure that it’s going to make a difference though.
With the barreled action installed, I was ready to set the length of pull. You’ll need a 3mm hex key to remove the buttplate. After selecting the correct amount of spacers, I used the appropriate length screws to put it all back together. KRG had provided me with some extra spacers and the rubber butt pad, which helped me get the perfect fit. Using a crisp $2 bill, I verified that my barrel floats in the chassis. The KRG installation instructions offer plenty of troubleshooting tips to help you get the best fit if it doesn’t fit right away.
Range time
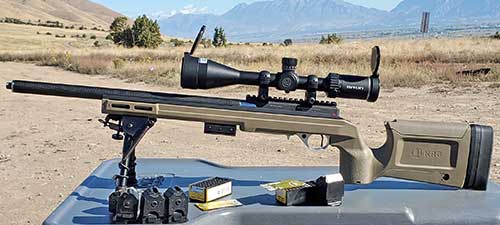
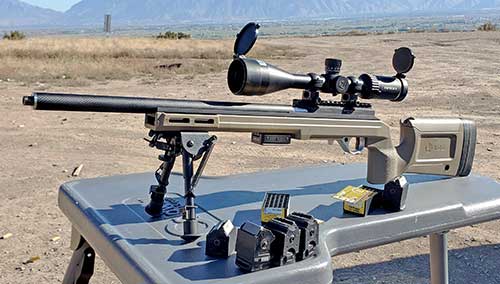
As mentioned, I used two different rifles in the KRG Bravo 10/22 chassis. After seeing what a solid foundation it provided, I removed my already very accurate CST/KIDD rifle from it. As I had a Summit Precision barrel that I was testing, I figured the Bravo would be the ideal chassis for that purpose. It’s not that I would use one for all my builds, rather to establish a baseline for accuracy, I wanted the most stable platform. Which the KRG Bravo 10/22 chassis provides.
It won’t turn a bad rifle into a sub-MOA gun, but it was easy enough to maintain MOA accuracy with such a solid setup. I’ve never had much of a problem clearing my KYL rack, and feel like I’ve now got a bit more of an edge.
From the bench with a bag or bipod, the Bravo Bravo 10/22 chassis is very comfortable. The fat grip quickly became my favorite, although I had to knock down a sharp edge just behind the trigger guard. That’s the only issue I had. I would probably have preferred to get their hook cover for the bottom of the buttstock for it too.
Overall weight of the rifle with the Bravo is still light enough to shoot standing, but this is really ideal off a bench. Although the cheek riser adjusts without tools, I left it at the lowest setting, due to the medium rings I was using. Next time I swap my scopes around, I am going with slightly taller rings to take advantage of the adjustable cheek riser. While it’s the right height for me, I like my friends to be able to try out all my fun rifles, including this one.
Observations (AKA, my opinion)
At its $259 MSRP, the KRG 10/22 Bravo chassis is priced quite fairly. Right out of the box, it really is a solid foundation for a competition rifle, or that “Dream build”. It includes plenty of features, and its modular design makes it easy to add other options. Adding a spigot mount for my bipod is easy enough if I decide to try one mounted far up front. As I use it more, I suspect that the tool-less length of pull (LOP) mechanism will be a handy addition. Adding the hook-style cover may not be something everyone wants, but if they do, it’s easy and inexpensive.
Of course, it’s not just the versatility. I keep using the phrase “solid foundation”, and mean that in the most literal sense. The KRG Bravo 10/22 chassis is very stiff, and my receivers were mounted very securely. If the goal is accuracy and consistency, this is the way. Same with ergonomics and fit. There is a very high degree of adjustment available, making it easy to get comfortable behind the rifle.
I’m going to continue to tinker with this chassis as I change up a few things on my rifle, and I expect that it will only get better the more I use it. Downsides? My magazines sit deep in the Bravo, which I don’t like. A minor issue, which was resolved with these TandemKross extended magazine bumpers.
I’d like to thank Kinetic Research Group for providing their KRG Bravo 10/22 chassis for testing and evaluation. Originally, I just wanted to try one out. After spending some time with it, it’s going to play a big role in future testing of gear where extreme accuracy is the main goal. Find yours, and the rest of their products, at KineticResearchGroup.com.