At the start of this project, I had mentioned that I would be upgrading some internal components. For convenience and reliability, I like to replace the bolt release, extractor, and bolt buffer. These are the three items I suggest replacing on every 10/22. But I got to chatting with my contact at TANDEMKROSS, and they offered to provide a couple of other items for this project as well*. Lucky for me, one of them was their “Ultimate” trigger kit. And they must have known that this rifle would be getting torn down at least once per week. Because they sent a set of their KrossPins too. So here’s a breakdown of each, along with details of the installation.
“Ultimate” Trigger Kit for Ruger® 10/22
This $134.99 kit includes a flat trigger shoe, hammer, sear, trigger spring, hex wrench, and slave pin (for easy installation). This is a collaboration between TANDEMKROSS and Brimstone Gunsmithing. Rather than try to reinvent the wheel, TANDEMKROSS joined with a company that’s also highly regarded by the 10/22 community. They came up with a trigger that pretty much drops into your stock trigger housing. Plan on one hour to install it. That’s about 40 minutes of watching the install video two times, and another 20 or so for the actual install. More details below their installation video.
As you can see, this isn’t a difficult install. If you can get the hammer, sear, and springs oriented correctly, it’s easy. Because there are differences between the stock trigger, and this one, you really need to watch the video. There’s an extra spring in the kit, which removes pretty much all pre-travel. They cover it well in the video, and I would have been lost had I not watched it a couple of times.
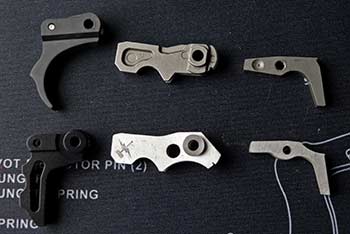
All the components are well made, and I really appreciate that they also included the slave pin. Beats making one out of a nail or Q-Tip. You can see in the images that all the parts are machined, and to better tolerances than factory. The end result is no extra play, and more consistency. And it looks great too.

I immediately took a liking to the trigger. It breaks at around 2 lbs. Plus I get more repeatable finger placement, which should help with accuracy. And with the included hex wrench, I can adjust out any over-travel. If you’re into bling, they also offer the trigger in red. I would have actually preferred flat black, to match the rest of the rifle, but that’s my only nit-pick.
Because I’m always behind on publishing articles, it’s already been to the range. And I have no complaints there. So check back for a full range report – I can tell you it’s a sweet trigger.
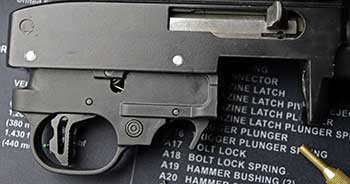
“Guardian” Bolt Release Plate for Ruger® 10/22
Again, this is on my “essentials” list. The factory release is just bad. It locks the bolt fine, but it’s like you need three hands to release it. Drop this $11.99 replacement part in, and simplify your life. The bolt locks back the same way as it did before. To release, just give it a tug to the rear. No more fumbling.
I can’t stress enough how convenient this product is. Honestly, Ruger needs to start installing these at the factory. My daughter has been shooting a 10/22 since she was 9. And this is the one area where she struggled. If you only replace one stock part on your 10/22, this one will be the one you’ll appreciate most.
“Eagle’s Talon” Extractor
From the factory, Ruger equips the 10/22 with a stamped steel extractor. And it mostly works okay. Once you’ve put a few rounds through your rifle, it may not do its job so great. And if you’re shooting hundreds of rounds per outing, all that nasty rimfire will dirty up your gun. At that point, your extractor will let you down, with failures to eject. It’s annoying while plinking, but can cost you in a competition.
Enter the $12.99 Eagle’s Talon. Hardened steel, with a much sharper hook. When your bolt is closed on a chambered round, the extractor slides over the rim, riding in a notch in the barrel. And that hook, rather than resting on the rim, gets a pretty good bite, thanks to the improved angle. As the bolt travels rearward, the Eagle’s Talon provides more positive extraction. Installation is pretty easy, requiring no special tools, just some patience.
I should point out that if you’re replacing your barrel, this is probably required. My new barrel surely has a tighter chamber than the original Ruger. Before installing this extractor, I had a few extraction issues, possibly due to the tighter tolerances. After installing the Eagle’s Talon, I have had zero issues. I’ll report back if that changes, but this is one of those products that just simply does its job. And so much better than the stock one.
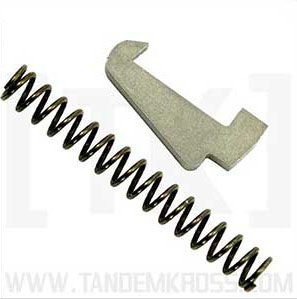
“Shock Block” Bolt Buffer
At $4.99, this is the least expensive upgrade. It’s also easy to install, and very effective. Your 10/22 receiver is aluminum, and has a steel bolt. With each round fired, that bolt flies back, only to be stopped by a steel “buffer” pin. I put that in quotes, because it’s not really buffering anything. Steel on steel impacts can’t be good for the longevity of your rifle. It also introduces extra noise and vibrations. Neither of which is something we want, if they can be avoided.
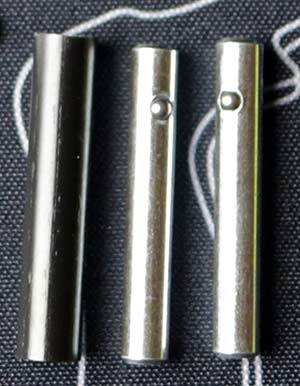
Installation of the Shock Block is as easy as pushing out the old buffer, and pushing this one in. As long as you have your receiver out for any of the items above, it’s no extra time or effort on your part. I’m not sure what non-metallic material this buffer is made from, but it’s oil and solvent resistant, and really does its job. Rather than the bolt slamming into steel before going forward again, it gets the tiniest bit of cushion. My rifles run a bit smoother, and with a suppressor, there is less noise as the rifle cycles.
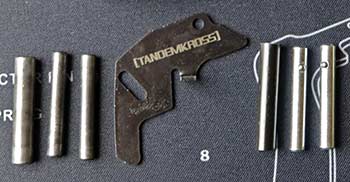
KrossPins
Brand new, or 20 years old, I have seen some slop in the crosspins of 10/22 receivers. And the older your rifle is, the more likely it is to get even worse. While the receiver is in the stock, the pins are captive. Once you remove the stock, they can fall out. Which they do. I’ve never personally lost one, but I’ve had to crawl around the garage floor looking for one. Not fun. Imagine losing one at the range, or while doing some service at a competition.
The solution is obvious, and will only set you back $9.99. KrossPins are stainless pins with a spring-loaded ball detent that installs like stock pins but don’t fall out. Installation is simple. Once you have your action out, the factory pins will probably drop out. If not, push them out with a punch. Then push the KrossPins in. They’ll stay put until you use a punch to remove them. I found it easier to push the end with the ball and detent in first, but it shouldn’t matter. If you do any regular work on your 10/22, you’ll think these are pure genius.
Next steps
I really wanted to do a detailed installation of each item, with my own video, but TANDEMKROSS covered that much better than I could. So I have included some of my own photos, and may write a few separate articles on each piece later. Most of these items, with the exception of the trigger upgrade, are pretty straightforward in their use. They just work as designed. If they don’t at some later point, I will publish my findings.
Before these parts were installed, I tried to get some accuracy data with the new barrel. I’m going to see how much my accuracy improves with the new trigger, and will report on that in a future article as well. I’ve also got a more in-depth review of the WhistlePig GunBarrel Co AccuLite barrel. In the meantime, if you have any questions or comments, feel free to share them below. **Note that WhistlePig is now known as Acculite22.com.**
Brian
Related posts in this series:
Intro
Barrel and stock
Mid-project range report
*Full disclosure: I was already a customer, as I like their products, and they have great prices and awesome service. So I signed up for their affiliate program, because they had already won my trust. I had the extractor on hand from a previous order, and was going to order the bolt release and bolt buffer. But they included those with the trigger and KrossPins at no charge. So all items listed, other than the extractor, were provided by TANDEMKROSS for testing and review. If you want to try them yourself, use the links in the article, or the banner to the right, to order them.
I have tinkered with 10/22s for a while now and I’m impressed by the thoughtful selection and the quality of the components here.
That having been said, it isn’t hard to make your own buffers. For years I bought 1/4″ partially threaded nylon bolts at Ace Hardware, though they no longer carry them. They had just enough unthreaded portion that you could cut off the head and trim the unthreaded section to 1 1/4″. They make perfect buffers that last for hundreds of rounds, or more. The material isn’t as durable as some but they were so inexpensive that I made a dozen. I inspect the buffer closely every time I clean the rifle. If it’s starting to look worn or misshapen, I toss it in the trash and drop in a fresh one. People have also used a steel pin, sometimes modified from a nail, in a length of rubber tubing.
If you want a “serious” buffer for hard use, go to the Internet and look for sellers of polymer rod stock in your favorite online marketplaces. The short list of good materials for this application, in no particular order because one might be more resistant to cleaning solvents, but another might be more resistant to impact and abrasion:
acetal polymer (also called “Delrin,” very wear resistant)
PTFE (the most expensive, and the most solvent resistant, but not the most wear resistant)
UHMWE polyethylene (not as solvent resistant as PTFE but very wear resistant)
Nylon 6-6 with molybdenum disulfide fill (good surface lubricity, good chemical resistance, not quite as tough as acetal or UHMWE
PEEK (polyetheretherketone, very tough, almost as solvent resistant as PTFE, can be expensive and difficult to source)
PPS (polyphenylene sulfide, not as tough as PEEK physically but better chemical resistance, also expensive and sometimes difficult to find)
Relatively inexpensive materials less suited, but which can be substituted if they’re cheap, with the caveat that they’re going to be more affected by solvents, wear more quickly, or both:
ABS (tough but common cleaning solvents will melt it, fast)
acrylic (not tough enough to make a buffer that will last long without cracking)
fiber reinforced polymers like Zytel, G-10, Micarta, Xenoy (can be less chemical resistant, also can delaminate or split)
HDPE (same solvent resistance as UHMWE but without UHMWE’s impact resistance or resistance to abrasion)
nylon (serviceable if cheap but buffers made of it will wear more rapidly than many and require frequent inspections)
PVC (insufficient chemical resistance, like ABS)
Polyetheramides are not recommended because they’re expensive, and not as impact resistant as materials much more economical.
…also, I just had my 10/22 apart and accidentally did a trigger job on it. Years ago I was at a gun store that had a large display of Ruger’s BX triggers. I examined every single one of them and picked out the one with the least takeup and cleanest break, right at three pounds. Though the trigger was still very nice, after a thorough cleaning I decided to detail strip the trigger group. I was displeased with the factory surface finish, the degree of wear, the burrs on the hammer spring guide, and the slight roughness I still perceived in cycling. I also found a small but very visible burr on the sear, dead center on the sharp knife edge of its engagement surface. I used 2000 grit sandpaper, then 2500 grit, to try to get that burr down. After a few minutes I decided I didn’t want to risk creating an unsafe situation.
I viewed some online tutorials saying that polishing compounds remove far less metal than sandpaper and are unlikely to create safety problems. So I warmed up the Dremel and got out the tube of Flitz and a carton of felt bobs and went to work. The burr was still visible when I decided I should probably stop, but it was somewhat reduced in height. So, while I had the Dremel out, I polished up the disconnector and hammer, being very careful not to reduce the depth of the sear notch, and polished the pin bosses on these components, the tail on the sear that the disconnector rides over to reset, the lug on the disconnector that captures the sear, the doll’s-head portion at the top of the hammer spring guide, the front face of the hammer where the bolt rides over it, the bottom rear surface of the bolt where it cocks the hammer, the curved surface on the bottom of the hammer below the sear notch, the cupped surface on top of the sear that accepts that curved portion of the hammer, and some other things. Then I put tiny dabs of synthetic red wheel bearing grease here and there and reassembled it.
The trigger is now about two pounds, if that, with all unaltered stock springs and the exact same sear angles and sear notch geometry as before. There is almost no perceptible takeup and a glass rod break. It has a bit more overtravel than I generally like but with the break being so light I think that if it had any less overtravel it might be a bit dangerous. It already fires while I think I’m still taking up the slack, and I will need to get used to it being so light, but it has passed all safety and functional tests thus far.
It is a very nice trigger, though I swear I never meant to do this. It’s a Takedown model I got years ago from a guy who bought one of the first ones to ship, then within weeks got bored with it. It’s a takedown .22 rifle with a skinny whippy 16″ sporter barrel and a cheap red dot stuck on top. I’m going to have to find a flat trigger that fits the BX trigger, and get a decent scope for it now, aren’t I? It isn’t fair.